
The Plan Organizer Grid shows a row for each Page in your project grouped by Discipline. The Plan Organizer shows you all the Plan Sets in this project and how they build the "Current Set" for the bid you are accessing.
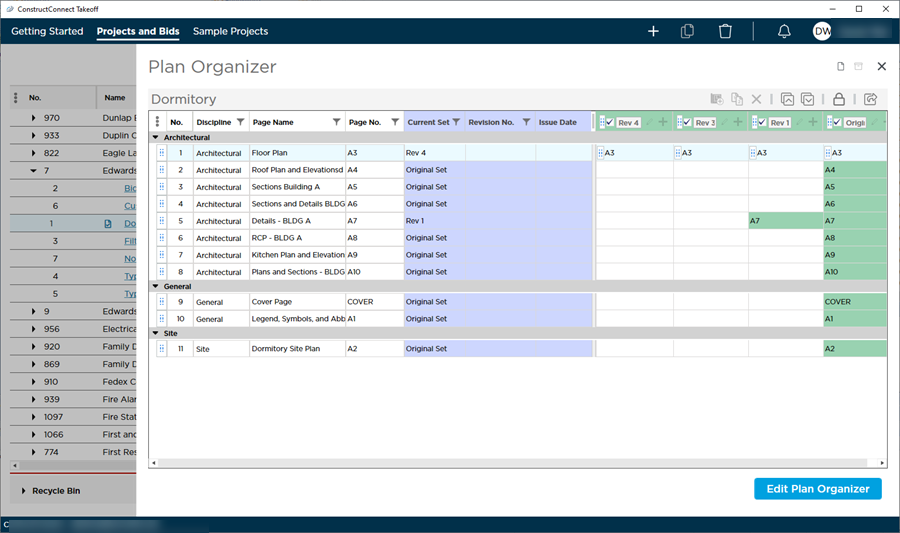
Notice how these rows (each representing a Page in this project) are grouped into Disciplines (Architectural General Site). The Plan Organizer Plan Set Editor and the Page Navigator on the Takeoff Tab are all grouped by Discipline. You can expand and collapse disciplines so you can concentrate on those Pages you need "right now". You can change a Plan's discipline by either selecting a different discipline from the drop-down or by dragging and dropping a plan into a different discipline group.
When you load a Plan Set the Discipline for each Page is based on the name of the file folder in which the plan file (the TIF PDF etc.) was stored. You can change a Page's Discipline any time
Controls
| Control | What it means/How it is used... |
|---|---|
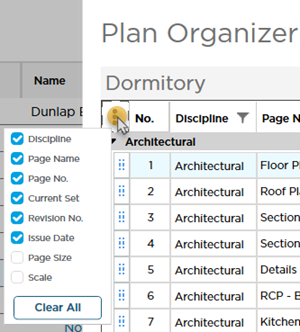
 | Opens the Column Picker so you can show additional columns or hide columns you do not want to see.
|
 | This is the Drag and Drop handle. At the head of a Page Row the handle allows you to drag-n-drop a Page to a new position within the Plan Organizer Grid (moving a Page changes the Page's row number (No.)) and possibly its Discipline depending on where you drop it. Drag the selected Page below the position where you want to drop it and release the mouse button. The program informs you exactly where you are dropping the Page. In the column headers this control also lets you drag-n-drop a Plan Set to a different position (by default newly added Plan Sets (the most current one) are added to the left of the Revision History columns). |
Columns
Those marked with an (*) are hidden by default.
| Column | What it means/How it's used |
|---|---|
| Page Information | |
| No. | The Row number of the Page based on its position in the Plan Organizer Grid. Not to be confused with "Page No." which is used for matching Revisions. |
| Discipline | Usually, each Page's Discipline is set in the Plan Set Editor based on the folder name in which the image file was located when added to the Plan Set. You can change it in the Plan Organizer, if necessary, by either selecting a different Discipline from the drop-down or by drag-n-drop. You can see in the screenshot above that our project contains three Pages each in a different Discipline (Carpentry Electrical and General).
On the Takeoff Tab the Page Navigator is grouped by Discipline (just like the Plan Organizer) so if you set the Discipline correctly navigating Pages is easier and more efficient because like Pages are grouped together. Disciplines are also used when sorting Pages for Printing.
|
| Page Name | The Page Name is updated in the Plan Set Editor. The Page Name shows in the Page Navigator drop-down on the Takeoff Tab so it is important that it is an accurate description of the Page. You can change your Page Name in the Plan Organizer if you did not update it in the Plan Set Editor. |
| Page No. | The Page No. is updated in the Plan Set Editor. The Page No can be shown in the Page Navigator drop-down on the Takeoff Tab. The Page No. is how you match Revisions to existing Pages in the Plan Set Editor, so it is best if the Page No. is taken from the Title Block on the drawing. You cannot change your Page Name in the Plan Organizer you can change Page No. only in the Plan Set Editor. |
| Current Set Information | |
| The Current Set is built by using the most current revision/issue in an active Plan Set for this Page. | |
| Current Set | Indicates the Plan Set this row (Page) is from. You can see in our screenshot above that our Current Set consists of three Pages each from a different Plan Set. |
| Revision No. | The Revision No. is entered in the Plan Set Editor and allows you to track how many Plan Sets are in a project and the order of their receipt. |
| Issue Date | The Issue Date is entered in the Plan Set Editor to indicate when the addenda Plan Set was issued. |
| Page Size (*) | Based on the image file properties as specified by the author (Architect). |
| Page Scale (*) | When you first add a Plan Set this is set to 1/8":1 but updates based on what you set the Scale to on the Takeoff Tab. |
| Sets/Revision History | |
| Every Plan Set you add to your project is shown in its own column with a Header showing its name. You use the Header to activate/deactivate a Plan Set for each Bid and to edit the Name of a Plan Set after you save it. | |
| Original | May be named "Original Set" (by default) but you can change the name to whatever you like when you create the Set. This is the initial Plan Set added to the Project. |
| Subsequent Set(s) | Each additional Plan Set you add becomes a new column to the left of the preceding Plan Set. The most recently added Set is always the first one on the left progressing backward through time as you move to the right toward the Original Set (that is unless you drag-n-drop a Plan Set and move it in the grid). |
Sets may be "Active" or "Inactive" meaning the check box next to the Set Name in Plan Organizer is either checked or not. We cover activating Plan Sets in Related Articles.
Related Articles
04.15 Activating Plan Set(s) for a in a ConstructConnect Takeoff Bid