
Attachment Takeoff Items are special Takeoff Items that are similar to Counts, however their takeoff objects must attach to a Parent takeoff objects (when you're drawing takeoff). Attachments can affect the Results for those Parents depending on how you set up the Attachment's properties. Do not confuse Attachment Takeoff Items with with File Attachments which allow you to attach an external file such as a photo or PDF directly to the Page. File Attachments are covered in Annotations and are not takeoff see Related Articles.
Attachments Takeoff Items are specific to either Linear or Area Takeoff Item parents. Parents are the objects to which you attach takeoff drawn with an Attachment Takeoff Item. For example walls and ceilings are parents and objects such as doors windows or light boxes are attached to them.
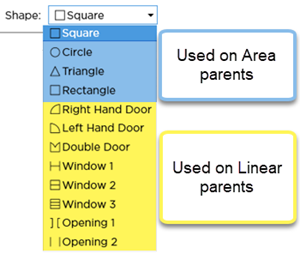
In the Takeoff Item Properties dialog box when you click the drop-down for Shape you see various Linear and Attachment Shapes (windows doors squares circles etc.). The Shape you select determines if the Attachment can be placed on a Linear or Area Parent. After you save an Attachment Takeoff Item the list truncates automatically and you cannot change from Linear to Area Attachment. If you realize you created a Linear Attachment Takeoff Item but needed an Area Attachment you just create a new Takeoff Item.
Examples
Linear Attachments
If the Parent is drawn with a Linear Takeoff Item such as a wall the (Linear) Attachment could be a window or a door - something that 'attaches' to the wall. Depending on how you set up the Parent and Attachment Takeoff Items and the Results you select in the Parent an Attachment may affect the linear or square footage results of the parent takeoff object. For example a window or door could reduce the parent Wall's total length measurement along with its total square footage neither or both.
For a Linear Attachment to reduce its parent object's length Result it must be taller than its parent (the Attachment's Height must be greater). For example a door that is 6' tall would not reduce the overall length Result of a wall that is 8' tall nor would the average window because its Height does not exceed the Height of the parent object. However if the parent object's Height is less than the Attachment's Height the overall length Result for the parent would be reduced.
Regardless of Height a Linear Attachment reduces the calculated square footage of its parent object (assuming the option to Backout quantities is selected and the parent's result is "minus attachments").
Linear Attachments only affect the parent Takeoff Item's volume results if they are taller than the parent Takeoff Item.
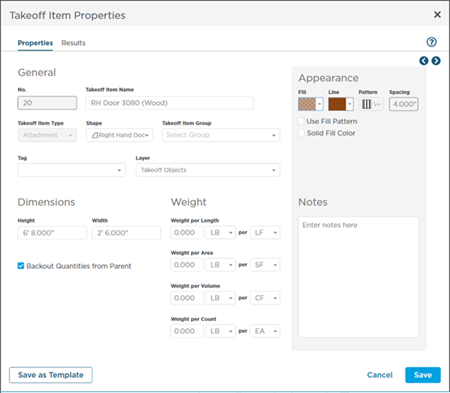
Linear Attachment Takeoff Item example
Area Attachments
If the Parent is drawn with an Area Takeoff Item such as an acoustical tile ceiling or a brick facade you use (Area) Attachments for lights vents windows or doors that reduce the surface area of the parent. Often times Area Attachments are used to reduce the number of needed tiles bricks stucco etc. needed to finish or cover a surface.
When you are placing Attachments on a gridded area they "snap" to the grid to make placement easier.
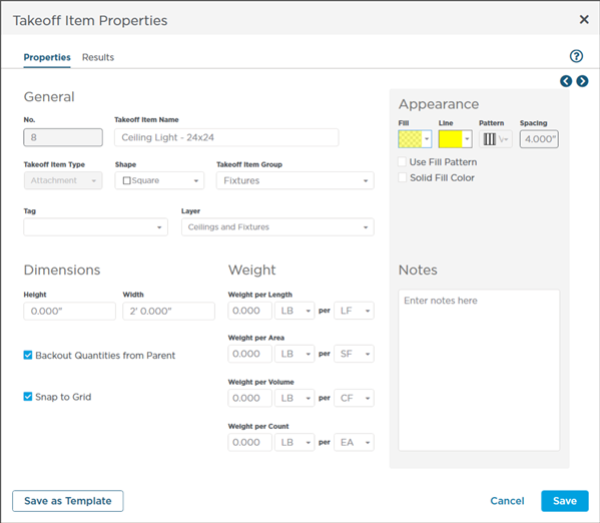
Area Attachment Takeoff Item example
Notice we mentioned windows and doors as Area Attachments and as Linear Attachments. We are not trying to confuse you, we promise. Think about how you take off a parent Takeoff Item - did you use a Linear or an Area. For objects such as brick facades or architectural finishes you may have taken off a wall (especially an exterior wall) on an elevation plan instead of an orthographic projection (birds' eye view). You still want to count those windows and doors but you cannot use a Linear Attachment on takeoff drawn with an Area Takeoff Item.
For example, a Linear-Based window Attachment cannot be attached to an Area object (such as a ceiling or facade) it only be placed on a Linear takeoff object such as a wall drawn on a "birds eye view" plan. In the same vein you can attach an Area Attachment (shapes such as squares, circles, hexagons, etc.) to an Area takeoff object only, not to a Linear takeoff object.
At this point you can click Save to save the Takeoff Item in this bid but you may want to select additional Results first (next article). If you want to save this Takeoff Item as a Template (Masters) click Save to Library we cover Takeoff Item Templates later in this chapter.
Fields in Attachment Takeoff Items
Most fields are pretty straight-forward Name Type Layer etc. But there are some that may have you scratching your head.
Some fields are available for Area Attachments others for Linear Attachments some for both.
| General | |
| Name | Whatever you want to name your Takeoff Item. It is best practice to be descriptive - for example: 24x60 Double Hung Window or 24x48 Lightbox are better than Window or Attachment Takeoff Item 1 (a descriptive name identifies the type of object and its basic dimensions). Takeoff Item Names are used throughout the program so take the time to name your Takeoff Item descriptively and accurately. |
| No. | The Takeoff Item number - automatically increments to next lowest number. Cannot be changed. |
| Type | Linear Area Count or Attachment (can be changed until you use this Takeoff Item to draw takeoff). |
| Shape | Select the Shape for this Attachment. The Shape you choose dictates the Results that can be calculated and to what Style of Parent takeoff objects can be "attached". See the screenshots above to see which Shapes are used for Linears and which are used for Areas. Remember you cannot use a Linear Attachment on an Area takeoff object or vice versa. |
| Group | The Takeoff Item Group can be used to filter or group the Takeoff Items Pane and the Summary and Worksheet Tabs. |
| Layer | See previous articles for more information on Layers. |
| Tag | Tags can be used to filter and grouping the Takeoff Items Pane much like Takeoff Item Groups. In a multi-user environment we recommend you add your name or initials as a Tag so you can filter and group the Takeoff Items Pane by Tag and concentrate on the Takeoff Items you need. |
| Appearance | |
| Color-Fill | Takeoff (the objects that show on the Plan) consists of two parts the outline of the takeoff object (Line) and the Fill. When creating a Linear the Fill is usually visible only for wide linears or when zoomed in. |
| Line | The outline of a takeoff object. |
| Solid Fill Color | Sets the object to be opaque - when you drawn a takeoff object it blocks anything behind it except for a Count object placed on top of an Attachment object. |
| Use Pattern | Specify how the Fill looks (does it have a pattern is it translucent ec.). |
| Spacing | Only visible when "Use Pattern" is checked; allows you to select the spacing of the pattern. If Grid is checked this setting is ignored because the actual grid is shown on the Plan. |
| Pattern | Only visible when "Use Pattern" is checked allows you to select the pattern (stripes checks etc.). If Grid is checked this setting is ignored because the actual grid is shown on the Plan. |
| Dimension | |
| Height | The Height of the Attachment object. Height is required if you want the program to calculate square footage or volume. It is important to remember that an Attachment object is likely 3 dimensional - think of a column a footing a window door or even a lightbox. If you want the program to calculate the square footage of the Attachment and the parent object correctly you need to set Height. |
| Width (or Diameter) | Looking at an orthographic projection how wide the object is. |
| Depth | Looking at an orthographic projection how deep (or long) the object is. Only shown for Rectangular Shape - all other Area Shapes assume Depth=Width. |
| Weight | |
| Weight per UOM | Allows you to specify a Weight by linear area cubic or count UOM depending on your needs. (Used with Results that include weight calculations see next article.) |
| Measurement | |
| Backout Quantities from Parent | This is an important difference between Counts and Attachments. Counts have no effect on other Takeoff Items Attachments can be set up to deduct their length and surface area from the parent's Results. When this option is checked (defaults to checked by the way) the program deduct the measurements of the Attachment object(s) from the Parent's Results.
|
| Properties | |
| Snap To Grid | When using an Area Attachment (Circle Triangle Square or Rectangle) and placing the Attachment on a gridded Area takeoff object the Attachment objects 'snap' to the drawn Area takeoff object's grid (actually to half the grid in case you need to span multiple "tiles" of a grid. This is helpful for example if you are taking off acoustical ceilings and you want light boxes to snap to the existing grid because that is how they would be installed. |
Depending on the Shape of the Attachment (making it a Linear or Area Attachment) you choose some fields (such as Width/Depth) may be suppressed or renamed. For example if your object is a Window you only need to specify the Height and Width and you would not have a "Snap to Grid" option but for an area Attachment such as a Rectangle you would specific width and depth and possibly "Snap to Grid".
Unlike a Count object an Attachment size must be displayed at the correct scale (based on its Dimensions) because it must 'fit' on its Parent object so there are no adjustments for "Visual Width" or "Visual Depth".
 Creating a Count Takeoff Item: Specifying the Results You Want to See Creating a Count Takeoff Item: Specifying the Results You Want to See | Creating an Attachment Takeoff Item: Specifying the Results You Want to See in Your Attachment Takeoff Item  |
Related Articles