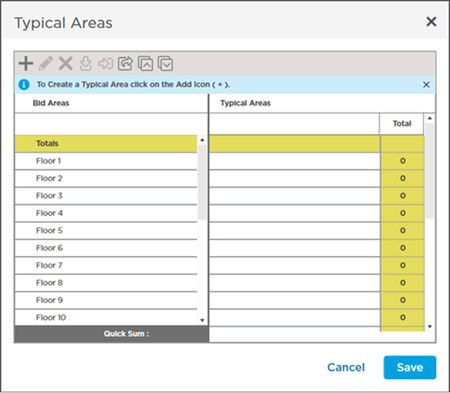
Typical Areas Dialog Box
Our example is going to be the elevator lobby of our high-rise condo building. There are a total of 23 floors: Floors 1 - 3 are unique then 4-22 are exactly the same; we are ignoring the top penthouse floor for our example. All floors share a common elevator lobby although the deck height is different for Floors 1 - 3 and for Floors 4-22.
If you are taking off something that is not affected by deck height such as flooring or ceilings you can use the same Typical Area (and Typical Group for that matter). To explain Typical Areas better however we are going to include tiling the walls of the elevator lobbies just for fun. Because the wall height is different we create two Typical Groups on for Floors 1-3 and the other for Floors 4-22.
We cover creating your Typical Areas in the next article we are just going to explain the Typical Areas dialog box and toolbar in this article.
You open the Typical Areas dialog box by clicking on the button in the Bid Areas Toolbar.

This opens the Typical Areas dialog box. Existing Bid Areas are listed along the left and a grid for Typical Areas on the right. (See Related Articles for a refresher on how to create Bid Areas).
Each Typical Area is a column in the right-side grid with cells that correspond to each Bid Area.

Before we continue let us look at that toolbar.
Typical Areas Toolbar

This toolbar provides the functionality you will need to add delete modify 'fill in' and export Typical Areas.
| Button | What it does... |
|---|---|
 | Inserts a new Typical Area (a new "column" is inserted to the right of the first Typical Area column). |
 | Deletes the currently selected Typical Areas from the grid. You are prompted to confirm deletion but even if you confirm your Typical Area is not deleted until you Save the changes and close the Typical Areas dialog box. |
 | Edits the name of the currently selected/active Typical Area you can also double-click on the header name for the Typical Area to put it in edit-mode. |
 | Fills the current value in the grid down (fills in all cells below the current cell with the same value) - this is very handy if all the Bid Areas below the current cell are the same - such as in our example where Floors 4-22 are identical. |
 | Fills the current value in the grid right (fills in all cells to the right of the current cell with the same value) - helpful when every Typical Area occurs the same number of times in the current Bid Areas. |
 | Exports the Typical Areas grid to an Excel file and then launches Excel to view file automatically. |
 | Expands all collapsed Bid Areas (because you can have "nested" Bid Areas (up to three levels) you can expand/collapse them as needed. |
 | Collapse all Bid Areas (so only Tier 1 Bid Areas are shown) |
Before you can start with Typical Areas you must setup Bid Areas. Typical Areas are set up as a matrix that tells the program that some block of takeoff exists some number of times in each Bid Area. See Related Articles if you need a refresher on Bid Areas.
Related Articles
