
By default the Worksheet Tab is populated with the Results with a check mark in the "W" column in the Takeoff Item Properties Results list.
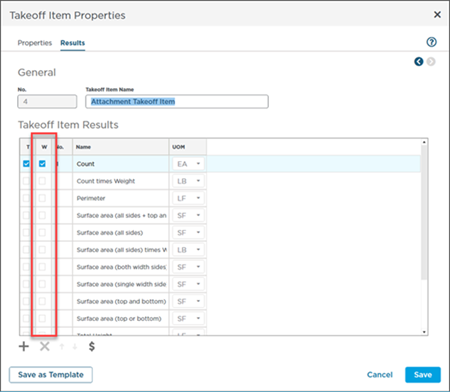 Takeoff Properties Results tab "T" for Takeoff Item Pane and "W" for Worksheet Tab
However anytime you want you can add additional Takeoff Item Results (or even Manual Results covered in the next article) to the Worksheet Tab.
Adding and Deleting Takeoff Item Result Rows
Adding a Takeoff Item Result
You can either right-click within the grid or click the  button on the main menu to add a new Takeoff Item Result to the grid - the new row is inserted where it falls based on the current sort of the grid not based on the row selected.
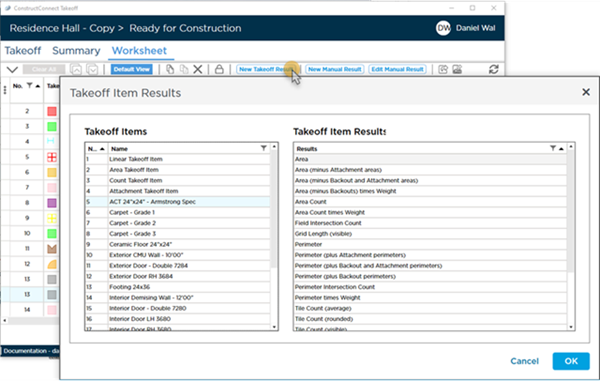
In the Select Takeoff Item Result dialog box, on the left is a list of all Takeoff Items in the bid (by name) - filter by Number or Name using the Column Filter button  .
.
On the right is every available Result for the selected Takeoff Item.
Results already shown on the Worksheet Tab cannot be added again. If necessary you can add a Custom Formula to duplicate a Result (for instance if you wanted two "length" results you would create a Custom Formula that uses the same calculation and name it "Length 2". See Related Articles for more information about Custom Formulas.
Highlight the Takeoff Item then the Result you want to insert into the Worksheet Tab grid and click OK. For our example we select Takeoff Item 13 "Floor Tile 24x24" and choose the "Perimeter plus Attachment Perimeters" result.
Click OK and the new Result row is added to the grid based on where it would fall according to however the grid is grouped and sorted currently.
You can go back and remove any Results for any Takeoff Items if you do not need them or just leave them there without any pricing - completely up to you. Removing a Result has no effect on any takeoff drawn with a Takeoff Item - all the results are calculated in the cloud regardless of your display choices.
You can also add "Manual Results" that are not based on any Takeoff Item see the next article for details.
Removing Unwanted Takeoff Item Result Rows
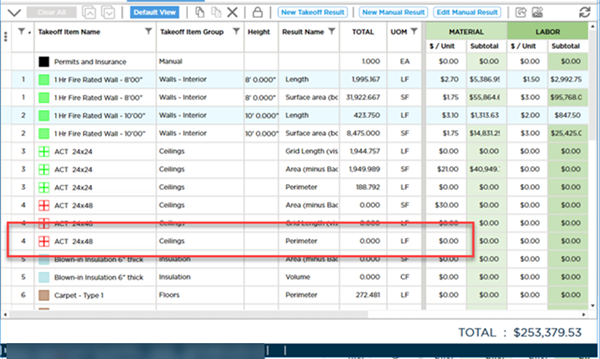
Typically if you select a Result in your Takeoff Item Properties there is a reason but just in case the first thing you will want to do is remove what you do not need from the Worksheet Tab. For example if you are pricing a wall and only need the surface area you can remove the linear measurement result.
Don't worry if you remove a Result row and later realize you need it just add the Result back - removing a Takeoff Item Result has no effect on the takeoff you drew it just doesn't display that Result anymore.
You can show Results in the Takeoff Items Pane on the Takeoff Tab the Worksheet Tab neither or both - just check or uncheck the "T" or "W" in the Takeoff Item's Results List. See Related Articles for more information about Takeoff Item Properties.
To remove a result row just highlight the row (or Rows) and click the  button or press <Delete> on your keyboard. You are asked to Confirm the action.
Remember when you remove a Takeoff Item Result you are not deleting any takeoff or deleting the formula - you are simply removing that Result row from the Worksheet Tab. You can always add the Takeoff Item Result back if you removed it in error.
By the way - you do not have to remove unneeded Result rows if you don't want to - just don't price them. Even if a Result is shown if you do not add a Unit Price no cost will be calculated. If you want to leave a Result on the Worksheet Tab just as a reference that is up to you.
 Worksheet Tab: Grouping Worksheet Tab: Grouping | Worksheet Tab: Adding and Removing Manual Results  |
Related Articles