
If you use Quick Bid® Professional Estimating application you can export your takeoff information from ConstructConnect Takeoff and import it directly into Quick Bid. Instructions for importing a takeoff file into Quick Bid to create a new bid or update an existing one are included below.
Things to know...
- The takeoff data file export includes only the top three Results for all Takeoff Items. If you want a Result exported to Quick Bid you must promote it within the Takeoff Item Properties Results list to one of the top three spots (Quick Bid supports three quantities only).
- Bid Area and Typical Areas are exported to Quick Bid.
- Typical Groups are not identified specifically in the export - just the takeoff quantities for each Marker are exported.
- When you update a Quick Bid project using a takeoff data file Takeoff Items Bid Areas and Typical Areas from ConstructConnect Takeoff replace anything existing in Quick Bid.
- ConstructConnect Takeoff does not support child bids (Alternates/Change Orders) and they will be removed if you update an existing Quick Bid project that includes any Alternates or Change Orders. If your Quick Bid project includes child bids duplicate the Quick Bid project import the changes into the duplicate then copy the Alternates/Change Orders from the original bid to the duplicate as needed.
- Pricing from the Worksheet Tab (Material Labor Equipment Subs Other) is not exported from ConstructConnect Takeoff only Takeoff Items Takeoff Bid Areas and Typical Areas are exported.
Exporting a Bid to Takeoff data file
To create a takeoff file you can import into Quick Bid:
- Open the Bid you want to export
- Open the Worksheet Tab
- Click the
 button to refresh the Results before exporting
 - Click on the
 button on the toolbar
 - Select where you want to save the export file - if Quick Bid is installed you may want to export to the "OCS Documents" folder (the default data location for Quick Bid)
- Click Save
ConstructConnect Takeoff creates the data file and confirms the export was successful.
Next you can use this takeoff data file to create a new bid in Quick Bid or update an existing one following the instructions below.
Using a Takeoff data file to Create a New Quick Bid project
Follow the instructions above for creating a takeoff data file (*.ost).
Once you have the *.ost file
- Open Quick Bid
- Click File > New > Bid from Takeoff... or
- Click the
 button and click Bid from Takeoff... or
 - Right-click anywhere in the Bids List and select New > Bid from Takeoff...
The Create bid from On-Screen Takeoff dialog displays
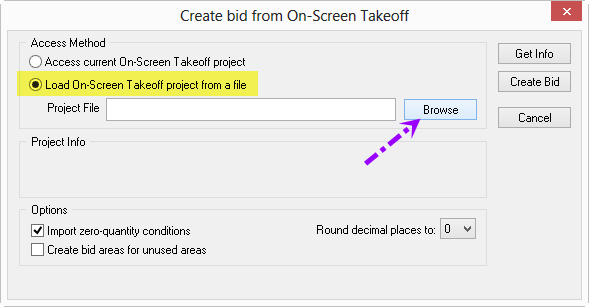
- Select Load On-Screen Takeoff project from a file as the Access Method (do not use "Access current On-Screen Takeoff project")
- Browse to the file location
- (Optional) Place a check in the Import zero-quantity conditions box - if checked ConstructConnect Takeoff Takeoff Item that do not have any Results (have not been used to draw takeoff) are still added to Quick Bid as Conditions
- (Optional) Place a check in the Create bid areas for unused areas box - if checked any Bid Areas created but to which no takeoff has been allocated in ConstructConnect Takeoff are added to Quick Bid
- (Optional) Select a number that Quick Bid will Round Decimal Places To - by default Quick Bid rounds values to 0 decimal places you can specify up to 4 decimal places.
- Click Create Bid - the Takeoff Items Areas and quantities are imported and visible on the Conditions Tab in Quick Bid
Note
For additional assistance with importing a takeoff file into Quick Bid see the Quick Bid User Guide.Using a Takeoff data file to Update an existing Quick Bid project
If you have created your Quick Bid project already and then make some changes to your bid in ConstructConnect Takeoff you can export the information again (from ConstructConnect Takeoff) and re-import it (into Quick Bid).
An existing Quick Bid project can be updated using a new *.ost file. (Note you do not create a Quick Bid bid package (*.qbp) from ConstructConnect Takeoff you create an *.ost file.)
- Follow the instructions above for exporting a takeoff file (*.ost).
Updating a Bid using an *.ost file overwrites all existing Quick Bid Conditions (Takeoff Items in CCTO) Quantities and Bid/Typical Areas in favor of those contained in the takeoff file. To be safe you can duplicate your Quick Bid project before updating - if you lose work you have a backup copy of your Project.
- Open Quick Bid
- On the Bids Tab select the Bid to update
- Right-click on it and select "Update from Takeoff..."
The Update dialog box opens (looks very similar to the "Create" dialog box...)
- Select "Import Takeoff file" as the Access Method
- Click Browse
- Navigate to the saved *.ost file
- Click on the *.ost file and select Open
Back in the Update dialog box if there are any Conditions (Takeoff Items) that exist in Quick Bid but not in CC-Takeoff you are prompted to delete them:
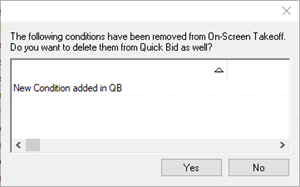
Select "No" if you want to keep the Conditions you added in Quick Bid (recommended).
- Select Options (see above for explanation of the options)
- Click Update Bid
The Quick Bid Conditions Bid/Typical Areas and Quantities are updated based on the values in the takeoff file (existing Areas are not deleted if they do not exist in ConstructConnect Takeoff although existing Quick Bid Conditions will be deleted if they do not exist in the takeoff file).
Existing Quick Bid information is overwritten in deference to the ConstructConnect Takeoff exported data. If you delete Takeoff Items (Conditions), Bid Areas, or Typical Areas from your takeoff project, or created anything in Quick Bid only, (meaning the Conditions (Takeoff Items), Bid Areas, or Typical Areas do not exist in the takeoff file) they will be deleted (permanently and instantly) from Quick Bid after the update. Also ConstructConnect Takeoff does not use child bids (Alternates and Change Orders) so if your Quick Bid project includes any of these those child bids are removed (permanently and instantly) from the Quick Bid project when you import the update file.
If in doubt create a new project in Quick Bid and import the ConstructConnect Takeoff information into that bid first to see what is going to happen. Then you can either use the same file to update your live estimate or copy and paste the information you need from your copy to your live bid keeping your live bid from being overwritten.
Next up you can copy and paste information from the Worksheet Tab and paste it into a document e-mail or spreadsheet.
Related Articles