
In the previous article (Assigning All Takeoff on a Page to a Bid Area) we showed you how to select all the takeoff on a Page and assign it to a single Area. If you recall our example included two pages that each contained takeoff for more than one floor. We need to assign the takeoff for Floors 2 and 3 to the correct Bid Areas so our Takeoff Item Results can be broken out accurately.
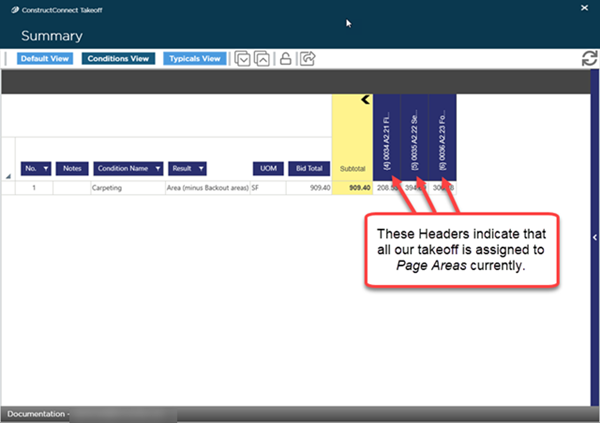
As a reminder for our example we took off three Pages the first one covers the 1st Floor of our project the second covers Floors 2 and 3 and the third covers Floors 4 and the Roof. We drew takeoff on all three Pages and if we take a look at the Summary Tab (see Related Articles for details on the Summary Tab) we can see that Page Areas are the only Bid Areas used for now.
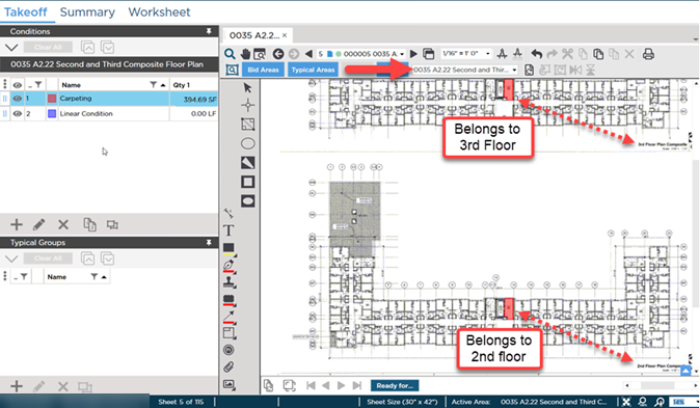
If we look at the second page it includes the plans for Floors 2 and 3. When we drew the takeoff we left the Area set to the Page Area and we can see that all the takeoff is assigned to the Page Area (0035 A2.22 Second and Third Floors Composite Floor Plan). We need to assign some of this takeoff to "Floor 2" and some to "Floor 3".
Because not all the takeoff on this Page will be assigned to the same Bid Area or Typical Area we select our takeoff a little more surgically than the previous article. See Related Articles for details on the various methods for selecting objects in the Takeoff Window. For our example there are two ways we can select some takeoff to assign to Floor 2 and not select the takeoff that needs to be assigned to Floor 3.
- Using the Select Tool click on one or more objects in the Takeoff Window to select them.
- Using the Select Tool draw a box around some objects to select them.
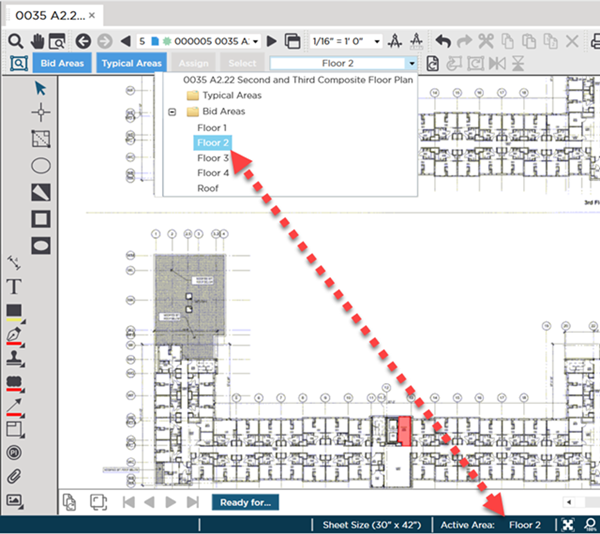
Notice the Page Area is the Active Area (both in the Areas drop-down and in the Status Bar).
We change the "Active Area" by clicking the drop-down and selecting "Floor 2". Remember all takeoff is assigned to the Active Area as it is drawn automatically. However existing takeoff must be selected and assigned to the Active Area - existing objects do not get reassigned automatically.
Next we assign the selected objects to that Active Area. Of course there is more than one way to do this:
- Click the
 button on the Areas Toolbar or
 - Right-click within the Takeoff Window and select "Assign to Current Area..." from the Context Menu. (Current Area is equivalent to Active Area.)
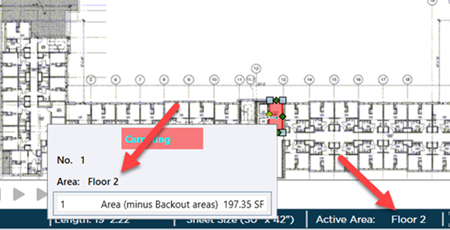
Now when we hover over a piece of takeoff we can see it is assigned to Floor 2...
Repeat this process for the object(s) that need to be assigned to "Floor 3".
- Set your Active Area
- Select Takeoff
- Click Assign
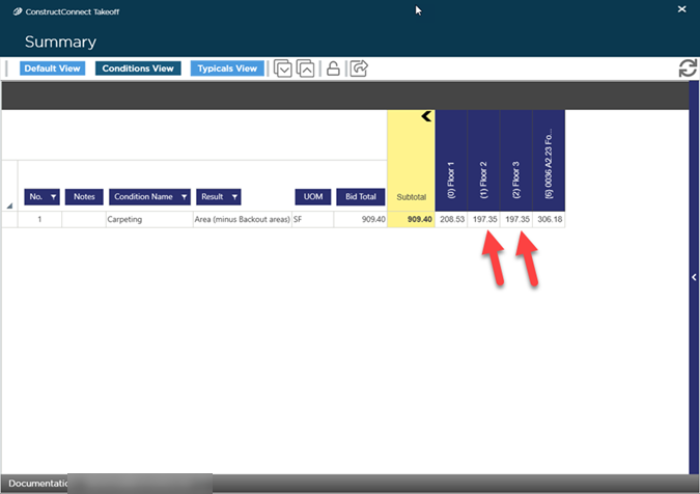
Now a look at the Summary Tab shows that our takeoff is assigned to Floor 1 (previous article) Floor 2 and Floor 3. We have not yet assigned the takeoff to Floor 4 or the Roof.
We would continue this for the third Page and assign takeoff to "Floor 4" and "Roof" just like we did for this Page.
When that is done we can review the Summary Tab one more time and see if we have assigned all our takeoff to the appropriate Bid Area.
Related Articles