
There are ten menus running across the top of the On-Screen Takeoff (OST) application window:
Many menu options are repeated in the various toolbars. If a menu selection has an Icon (Picture) next to it - there is a toolbar button available for that command - toolbars are covered in the articles that follow.

The name of the current Bid and database always shows in the Title Bar of the application along with the name of the product.
Shortcuts
There are shortcuts for many actions! These save time and increase efficiency - see Related Articles for more information.
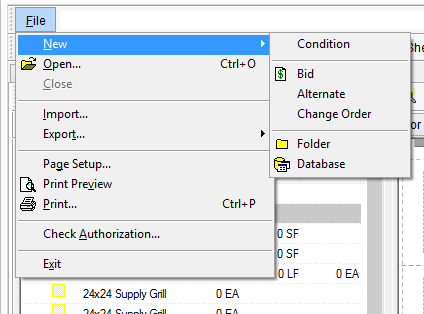
The File Menu
The File menu provides options to open and/or create Projects/Bids, Databases, Alternates, and Change Orders., import and export Bids, access printer functions and setup, and open the Check Authorization screen where you can manage product licenses.
| Button | Options | Sub-Option | Shortcut Key | What it does/How it is used... |
|---|---|---|---|---|
| New > | Condition | <Insert> | Creates a new Condition (active only from the Takeoff Tab) | |
| Bid | Creates a new Bid | |||
| Alternate | Creates a new Alternate | |||
| Change Order | Creates a new Change Order | |||
| Folder | Creates a new Folder on the Projects Tab or in the Conditions Window | |||
| Database | Creates a new empty Database | |||
| Open | <Ctrl> + <O> | Launches the Open Database dialog box to open/close/manage available databases | ||
| Close | Closes the selected Database | |||
| Import | Imports a Bid Package or Takeoff File | |||
| Export... > | To Takeoff File | Exports the current Bid to a Takeoff file (.ost file) | ||
| To Bid Package | Exports the current Bid to a Bid package (.osp file) - this option is only available to licensed users | |||
| Page Setup | Accesses printer options for layout, orientation, etc. | |||
| Print Preview | Preview the print job | |||
| <Ctrl> + <P> | Send current preview or Tab to a printer | |||
| Check Authorization | Opens the Authorization dialog box | |||
 | Exit | <Alt> + <F4> | Exits the program. When exiting the program and there are multiple databases open or a very large database open, it may take several seconds for the database(s) to be correctly closed. Bid Locks are removed when the databases are completely closed. | |
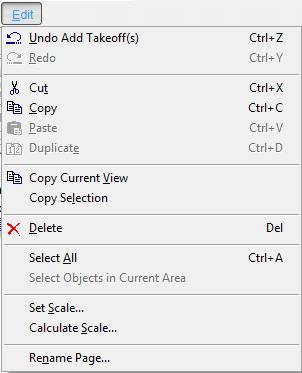
The Edit menu
The Edit menu provides access to basic editing commands (such as copying and pasting, selecting objects, and setting scale). Product-specific options are explained, common options (such as copying/pasting) are assume to be understood.
| Button | Name | Shortcut Key | What it does/How it is used... |
|---|---|---|---|
| Undo | <Ctrl> + <Z> | Undo the last takeoff action (very limited function). Changes to the database (editing Master tables) cannot be undone with Undo. Also, Deleting Pages, Conditions, Zones, or Typical Groups cannot be undone.
| |
| Redo | ReDo the last undone action | ||
| Duplicate | <Ctrl> + <D> | Creates a duplicate of the selected object and places it in the same location automatically. Duplicating applies to Bids, Conditions, Styles and Style Sets when selected. | |
| Copy Current View | Copies current view to the Windows Clipboard for pasting in a different application like an e-mail or a document | ||
| Copy Selection | Copies selection made with roping as a bitmap for pasting in a different application. Select this option, then draw a box around what is to be copied and then right-click over the selection and select Copy. Then, paste the copied information into a document or e-mail. | ||
| Delete | <Del><Delete> | Deletes the selected item(s) (Bid, Conditions, takeoff objects, or Master table entries) Base Bids are moved to the Deleted Bids folder. Master Table entries, Conditions, Typical Groups and Zones, Alternates and Changes Orders, and Pages are immediately and irretrievably deleted. Deleted takeoff objects and annotations can be restored by 'Undo-ing' the action (above) until you navigate away from the Page.
| |
| Select All | <Ctrl> + <A> | Selects all objects depending on where the last focus was (if it was in the Condition window, all Conditions are selected; if focus is on the Image Window, all takeoff is selected ,etc.) | |
| Select Objects in Current Area | Selects all objects assigned to the currently selected Area on the page | ||
| Set Scale | Set the scale for the current page It is vital that you Set and Verify scale before doing any takeoff. See Related Articles for more information. | ||
| Calculate Scale | Calculates the scale according to a known measurement between two points on the Image or Drawing. | ||
| Rename Page | Opens a dialog box where you can rename the current page and then navigator to the next/previous page to rename that as well. |
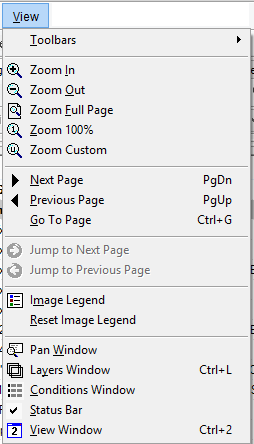
The View menu
The View menu provides options for changing your view of the current page, zoom level, and customizing the view of certain windows and toolbars. From the View menu, click Toolbars to see a list of all the available toolbars. Toggle the check mark for a toolbar to show/hide it in the Main window.
| Button | Name | Shortcut Key | What it does/How it is used... |
|---|---|---|---|
| Toolbars > | Show/Hide the various toolbars available in On-Screen Takeoff | ||
| Zoom In | <+> | Zooms in on the current image view in small increments | |
| Zoom Out | <-> | Zooms out of the current image view in small increments | |
| Zoom Full Page | <*> | Zooms to a full page view of the current page | |
| Zoom 100% | Zooms into a scaled view of the current Image View | ||
 | Zoom Custom | Zooms to a customized percentage set by the user | |
| Next Page | <Page Down> | Advances to next page in the project | |
| Previous Page | <Page Up> | Rolls back to previous page in the project | |
| Go To Page | Changes to a specific page in the project | ||
 | Forward | Advances to the next available page in the history of viewed pages - only active if the Back button has been used - works Like the Forward button in an Internet browser | |
 | Back | Navigates to the last viewed zoom level or page - like the Back button in an Internet browser | |
| Image Legend | Toggles the Image Legend on this page On/Off | ||
| Reset Image Legend | Resets the Image Legend to its original location and order | ||
| Pan Window | Toggles the Pan Window On/Off | ||
| Layers Window | <Ctrl> + <L> | Toggles the Layers window On/Off | |
| Condition window | Toggles the Condition window On/Off | ||
| Status Bar | Toggles the Status Bar On/Off | ||
| View Window | <Ctrl> + <2> | Toggles the Named View Window On/Off |
The Tools menu
The Tools menu provides access to various tools used on the Takeoff Tab such as the Takeoff, Annotation, and Zooming tools. The Tools menu also includes important database management tools and dialogs.
There are three sections to the Tools Menu: Main Tools, Takeoff Mode Tools, and Database Management/Options.
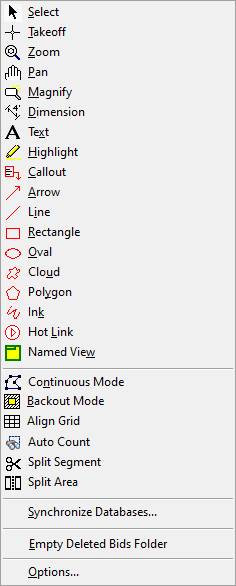
Main Tools
| Button | Name | Shortcut Key | What it does/How it is used... |
|---|---|---|---|
| Select | <Spacebar> | Changes the mouse pointer to Select Mode - use this tool to select Conditions, takeoff objects, and to select commands/buttons. | |
| Takeoff | <Spacebar> | Changes the mouse pointer to Takeoff Mode - use this tool to draw takeoff. | |
| Zoom | <+>, < ->, <*> | Changes the mouse pointer to Zoom Mode - Left-click to Zoom In and right-click to Zoom Out, draw a box around an area of the image to zoom in on it. | |
| Pan | Changes the mouse pointer to Pan Mode - use this tool to pan (move) the current view around the page. | ||
| Magnify | Changes the mouse pointer to Magnify Mode - use this tool to magnify a region of a plan without zooming in. | ||
| Dimension | Changes the mouse pointer to Dimension Mode - this is an Annotation tool used to place a dimension (reference) line on a page. | ||
| Text | Changes the mouse pointer to Text Mode - this is an Annotation tool used to place a Text box on the page allowing notation. | ||
 | Highlight | Changes the mouse pointer to Highlighter Mode - this is an Annotation tool used to place a Highlight box on the page. | |
 | Callout Tool | Draws a text box with an attached arrow to draw attention to something important on the plan (defaults to red) | |
| Arrow Tool | Draws a single-ended arrow (defaults to red) | ||
 | Line Tool | Draws a line (defaults to red) | |
 | Rectangle Tool | Draws a rectangle (defaults to red) | |
 | Oval Tool | Draws an oval (defaults to red) | |
 | Cloud Tool | Allows an estimator to click several points surrounding a region of the plan and draws a cloud around the region (defaults to red) | |
 | Polygon Tool | Allows an estimator to click several points surrounding a region of the plan and draws a border around the region (defaults to red) | |
 | Ink Annotation Tool | Allows an estimator to draw a freehand "ink" annotation (defaults to red) | |
| Hot Link | Changes the mouse pointer to Hot Link Mode - this is an Annotation tool used to place a Hot Link on the page. | ||
| Named View | Changes the mouse pointer to Named View Mode - this is an Annotation tool used to create a Named View on the page. |
Takeoff Mode Tools
| Button | Name | What it does/How it is used... |
|---|---|---|
| Continuous Mode | Changes the mouse pointer to Continuous Mode. This is a tool used to takeoff multiple segments of a linear object when the beginning of each new segment starts where the previous segment ends. | |
| Backout Mode | Changes the mouse pointer to Backout Mode. This is a tool used to create a backout within area-based takeoff. | |
| Align Grid | Changes mouse pointer to Align Grid Mode. This tool aligns the grid, allowing for portions of the grid to show complete blocks in the grid for more accurate count calculations. | |
| Auto Count | Activates the Auto Count function. | |
 | Split Segment | Allows you to split a single, long linear takeoff object into two shorter segments. |
 | Split Area | Allows you to draw a line bisecting an area takeoff object splitting it into two or more smaller objects. |
 | Simplify Area | Analyzes an area takeoff object and removes unnecessary vertices to make fewer, straighter segments. |
Database Management and Options
| Option/Selection | What it does/How it is used... |
|---|---|
| Synchronize Databases... | Allows user to copy all or some of a selected source database tables to a target database (does not copy any Bids). |
| Empty Deleted Bids Folder... | Empties all deleted Bids from the Recycle Bin. |
| Options... | Open the Options dialog for modifying defaults and preferences for the application. |
The Image menu
The Image menu provides access to various Image manipulation tools. Images may be darkened, rotated, inverted and enhanced. There is also an option to convert images to TIFF format. Sometimes, files provided by an Architect can be of such complexity that rendering the image causes performance issues - converting these files to TIFF images is a great way to improve application performance. It is recommended to convert to tiff before drawing any takeoff, exporting a Bid, or sending a Bid via e-mail or Project Express.
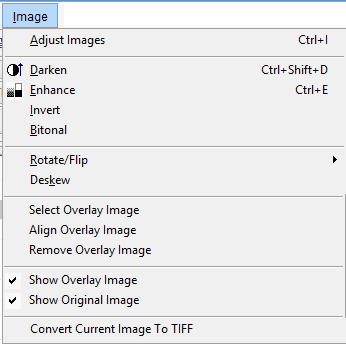
Adjusting image(s) in OST only affects the way the program displays the image(s), it does not actually edit the image file. However, when you resize or modify an Overlay, OST creates a copy of the original file and does save changes to that copy.
| Name | What it does/How it is used... |
|---|---|
| Adjust Images | Adjust the image properties on a single page or all pages - allows darkening, enhancing, etc |
Darken  | Adjusts the darkness of the image |
| Enhance | Auto adjusts (enhances) the lines in the image that may have missing dots or inconsistent patterns |
| Invert | Reverses (inverts) the black on white properties for the image |
| Bitonal | Turns a color image into a black and white (bitonal) image can make drawing takeoff easier |
| Rotate/Flip | Contains commands for rotating and flipping both takeoff objects and images that are displayed on the Image Tab |
| Deskew | Allows manual alignment of the plans to a drawn horizontal reference |
| Select Overlay Image | Creates a link for an Overlay Image file and specifies it at the Bid Cover Sheet for that page |
| Align Overlay Image | Allows manual alignment of the Overlay Image with the Original Image |
| Remove Overlay Image | Removes the Overlay Image from the project |
| Show Original Image | Toggles the Original Image to be visible or not |
| Show Overlay Image | Toggles the Overlay Image to be visible or not |
| Convert Current Image To TIFF | Converts the image in view to TIFF. |
The Bid Menu
The Bid menu provides access to several Bid configuration commands and Bid level functions.

| Option/Selection | Button/Icon | What it does/How it is used... |
|---|---|---|
| Show Cover Sheet | Displays the Cover Sheet of the current Bid | |
| Show Areas | Displays all building Areas used in the current Bid | |
| Show Typical Areas | Displays the Typical Areas dialog box (if Typical Groups are used, this option is disabled) | |
| Renumber Conditions | Renumbers the Conditions in the Conditions Window based on the current sort order. This cannot be undone! | |
| Refresh Worksheet(or press F9) | Refreshes data linked to Microsoft Excel |
The Master Menu
The Master menu provides access to the master records tables in the current database. Master database tables hold information available to all Bids in the database.

The options in the Master menu are also referred to as Master menu or Master Database tables.
| Option/Selection | What it does/How it is used... |
|---|---|
| Employees | Click to pull up the Employees table of the database. Employees can be used to assign rights to certain employees and sort/organize the Bids Tab. |
| Job Statuses | Click to pull up the Job Statuses table. This table includes all the defined Job Statuses within the database that can be used to the track current status of a job as well as lock jobs that are in a certain status. You can also group the Projects Tab by Job Status to organize your Projects. |
| Condition Types | Click to pull up the Condition Type table of the database. Used to separate and group conditions logically by Condition Type. |
| Style Library and Sets | Click to pull up the Style Library and Style Sets dialog box. This dialog allows you to view and modify Styles (saved Conditions) and Style Sets (groups of saved Conditions) |
| Default Layers | Click to pull up the Default Layers table of the database. Default layers are automatically added to every future job. |
Masters are covered in Related Articles.
The Digitizer menu
The Digitizer menu provides access to manage the Digital Takeoff Table and/or other digitizer settings and driver information.

| Option/Selection | What it does/How it is used... |
|---|---|
| Use Digital Takeoff Table | Allows OSTto interact with On Center Software's Digital Takeoff Table |
| Use Digitizer | Allows OST to interact with a standard GTCO (or Compatible) digitizing board. |
| Place Template... | Takes input from the user to designate where the mouse template is located on the digitizer board. |
| Set Takeoff Area... | Takes input from the user to designate where the upper left and bottom right corner of the blueprints are in relation to the digitizer board. |
| Digitizer Info | Displays information about the digitizer currently installed. |
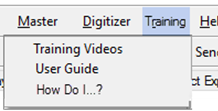
The Training Menu
The Training menu provides access to online resources such as the Training Videos, this User Guide, and a form where you can submit a "How Do I...?" request to our Training Department.
The Help Menu
The Help menu provides access to the online Program Help files (OSTHelp - <F1>), the ability to request Support and Features, view Frequently Asked Questions, and the version of OST(About On-Screen Takeoff...).
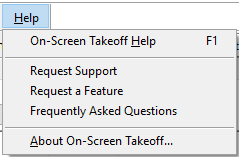
The Training and Help menus provide quick access to Online Resources that open in your computer's default Internet browser and require an active Internet connection.
 Takeoff Boost Takeoff Boost | The Main Toolbar  |
Related Articles