
The View Window is a third Image Window that can display a different page of a project or a Named View. This is very handy if you want to keep a Detail or Schedule page up on one monitor while performing takeoff on a second monitor. The View Window is just that - it's used only for viewing Pages - you cannot perform takeoff or draw annotations within the View Window (you can draw Annotations and Set Scale in the Annotation and View Window covered in the previous article).
You can only open the (3rd) View Window when the Annotation and View Window is already open or you click on a Hot Link (and your Options are configured to open Named Views in the View Window).
To open the View Window, click the ![]() in the View toolbar.
in the View toolbar.
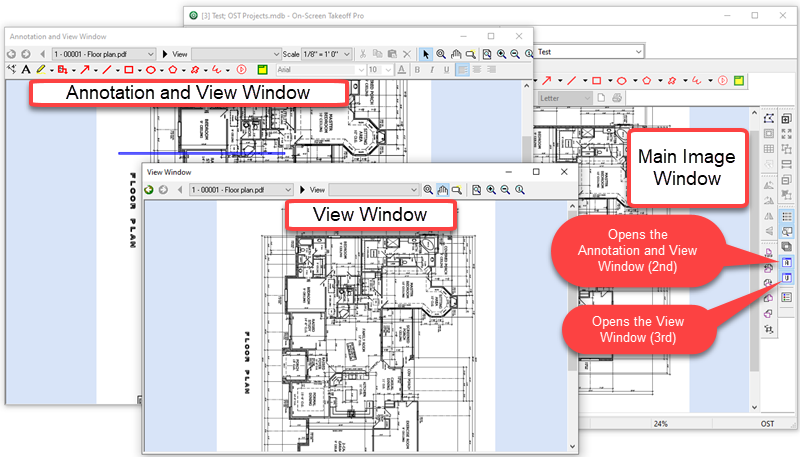
When the View Windows opens, there are several toolbars at the top with functions that correspond to the same toolbars in the main Image Window (there are just fewer tools available). See Related Articles for a refresher on the various toolbars available in the View Window.
- Page Navigator - allows you to select the Page or View you want to display in the View Window. You can use the Navigation Toolbar, just like on the Image Window, to select a specific page or move forward and back through pages.
- Zoom - tools that allow you to zoom in and out on a plan.
- Views drop-down - allows you to select from an existing Named View and navigate directly to it.

Many estimators find it beneficial to create a Named View for the detail pages/sections of their plans - they then can easily access these details when performing takeoff on the regular plans while keeping the details open in the View Window on a second monitor.
As you draw annotation (markups, Named Views, Hot Links) in either the Image Window or the Annotation and View Window, it is reflected immediately in the View Window, and vice-versa. However, when you draw takeoff in the Image Window, that is not updated in the View or Annotation and View Windows until you reload the Page (leave it and return).
Now, you should be comfortable with all the tools and screens on the Takeoff Tab, let's dig in and start talking about takeoff and how to measure various objects on your plans. The first thing we need to do is explain what a Condition is and how it's used to draw measurements (perform takeoff).
 Annotation and View Window Annotation and View Window | Resource Center Panel  |
Related Articles