
The Overlay feature allow an addendum drawing to overlay the Base image, making it easy to identify changes. Think of this like placing two drawings on top of one another and being able to see changes between the two. Although Overlays can be assigned on the Cover Sheet (see Related articles) the instructions below are geared toward adding Overlays using the "Add Overlay" option available in the Context Menu in the Image Window, on the Takeoff Tab.
Overlay Rules, Restrictions, and Notes
- Only one overlay image can be associated with a single base page. If there are multiple addenda for the same page, the base page must be duplicated, and then each addendum overlaid on a copy of the original. (If you routinely compare multiple revisions of a drawing/plan, consider our cloud-based takeoff product, ConstructConnect Takeoff - it supports comparing a limitless number of different revisions.)
- An Overlay cannot be an indexed (multi-page) file. Each Overlay must be a single page file (an example of an indexed file is a single PDF file that contains multiple pages - in this case, only Page 1 can be displayed as an overlay. Use an external PDF viewer to extract the individual pages, if necessary).
- When adding an overlay to a page on the Image Tab, the program automatically attempts to resize the overlay to match the base image. It is possible to adjust the overlay manually using the steps below to fine-tune the image.
- When an Overlay is added to a base image on the Image Tab, or resized, a copy of the overlay image is saved as a tiff in a folder named "Overlays" and all changes are saved to that tiff file. The Cover Sheet is updated to indicate the overlay file is the tiff (the original overlay file is not altered). Adding Overlays directly on the Cover Sheet does not automatically create a tiff copy - unless the Overlay is resized.
- Overlay images are always displayed in grey-scale, regardless of whether the image file is color.
- At high zoom levels, pixel-level differences are bound to occur - this is simply the nature of digital imagery. The Overlay function is designed to show you differences in the plan at reasonable zoom and will highlight any changes, even a pixel difference, between the Base and Overlay images.
- Additions appear in BLUE (meaning something exists only on the overlay) and deletions appear in RED (meaning something exists only on the original (or BASE) image)
When you add an overlay to a project from the Image Tab, On-Screen Takeoff makes a copy of that overlay file and places it in an "Overlay" folder in the "Image Folder" as indicated on the Cover Sheet. Any alignment or resizing changes are made directly to that copy.
If you add an overlay via the Cover Sheet, you bypass that copy creation process. Any alignment/resizing done to the overlay could affect the base image on another Page because the changes are being made directly to the image file, not a copy. If you've used this file as the base image or overlay on another Page, you will be resizing/aligning it anywhere it is used which may cause takeoff to no longer match the plans.
We recommend you always add Overlays via the Image Tab unless it is necessary to use the Cover Sheet method. If you do use the Cover Sheet method, make a copy of every file you are going to use as an overlay, put it in an "Overlays" folder (where the original files are stored), and then use those copies as the overlay image files.
Overlay Example
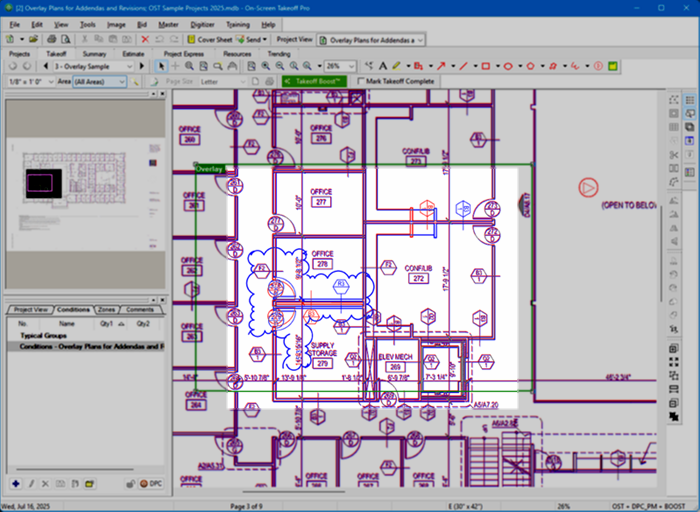
Notice that the Overlay shows some artifacts in red (those exist on the base image, but not the Overlay image), and some in blue (those do not exist on the base image but only on the Overlay).
An easy way to remember this is “red is dead, and blue is new”.
Overlay toolbar
The Overlay Toolbar provides quick access to adding, resizing, deskewing, and removing overlay drawings, along with toggling current view.

By default, this toolbar is docked below the Image Toolbar, on the right side of the application.
| Button Icon | Function | What it does/What it means... | Keyboard Shortcut |
|---|---|---|---|
 | Add Overlay | Opens a dialog box where you select which plan/image you want to overlay to the current Plan | |
 | Resize Overlay | Launches the Resize Overlay wizard so you can resize the overlay to match the Base image/takeoff on the current page. | <Alt> + <R> |
 | Align Overlay | Allows you to fine-tune alignment between the overlay and base images | |
 | Deskew Overlay | Just like deskewing a base image, allows you to correct for slightly skewed drawings (typically happens when paper plans are scanned) | |
 | Remove Overlay | Removes the overlay from current page - you can then select/add a new overlay | |
 | Toggle Base-Overlay-Both | Toggles the view between Base Image, Overlay, and Both. Button shading changes depending on which view is active: - Both;  Base only; Base only;  Overlay only; Overlay only; |
The articles that follow walk you through selecting an overlay and then adjusting it, so it matches your base image.
If you are using Digital Production Control, please note that overlay images are not included in DPC Bid Packages and overlays are not visible (or accessible) to Foremen. Do not perform takeoff on an overlay (when you've turned 'off' the base image). Swap the overlay and base images, or create a duplicate of the Page and make the overlay the base image, so that you are performing takeoff on the base image, which can be sent to the field.
 Converting Image Files (Drawings) to TIFF Format Converting Image Files (Drawings) to TIFF Format | Selecting an Overlay Image  |
Related Articles