
To create an Excel template and pre-define linked cells within the template follow the procedure below.
Open Excel to a new blank spreadsheet.

- Click on the File Ribbon Tab in Excel
- Click on Save As in the drop-down menu
- Click on Browse

This opens the Save As window. From this window,
- Click on the Save As type drop-down menu
- Select Excel Template (*xltx), which is the latest Excel template file format

- Name your template, for our example, we will name it "Rand Template.xltx"
- Click Save
This template is saved in the default template directory: C:\Users\<username>\Documents\Custom Office Templates.
- If you wish to save it elsewhere, select a different drive or directory

The Excel spreadsheet is now a template, named “Rand Template.xltx”.

- Click on the PlanSwift Ribbon-bar Tab, then click on any cell .

The Takeoff Group buttons (Area, Linear, Segment, and Count) become active.

To continue with our basic example,
- Type in Area, Linear, Segment, and Count into cells A2 to A5 , and click in cell B2.

- Click on the Area icon to open the Define Template window

In the Define Area Template window,
- Enter in "Concrete" for the Name, "Front Sidewalk" for the Description, and "Miscellaneous" for the Target Folder,
If you click on the From Cell box and click the ellipsis (...) below the box, then a Range Picker box (1) appears allowing you to enter the cell to be used for the Name.
- Enter the cell number. for instance, "A2"
- Click OK - the contents of cell A2 are used in the template.
- Click the Color drop-down menu to choose the color for this takeoff item.
- You can edit the Property Name and the Property Formula here, also
- Click OK.
A small red triangle appears in the top-right corner of the cell when the template properties have been defined.


- Click on cell B3
- This time right-click on the cell to open the Context Menu
- Hover over PlanSwift - Define Template
- Click on Linear Designer

This opens the Define Linear Template window, which works similarly to the Define Area Template window.
- Enter whatever data you would like for this linear value
- Click OK

The Segment and Count windows work similarly.


Once all of the fields are filled in the way you want,
- Click on the File Tab
- Click Save - this updates your current Excel template file

- Now open PlanSwift and start a new job
- Enter a Job/Quote # or name and a Description
- Click Next

In the Image Files window,
- Click Next to skip it.
- Click Yes when you're asked if you want to continue without adding any images (you can add Pages to this Job anytime)

- Click Next on the Convert Settings window

- Click on Finish in the Ready to Create Job window

Once the Job is created,
- Click on the green Plus (+) under Pages, Bookmarks
- Select Blank Page
- Click Next

- Name this new Page, (for our example, "Our New Page"
- Click Finish

The "Our New Page" is added to your Job and is now open and set up.

- Click on the Tools Ribbon-bar Tab
- Click Attach Excel File to Job
- Navigate to where you saved the template (Rand Template.xltx)
- Select the Rand Template.xltx and click Open

- In the right-side panel, select Attachments to open the Attachments window
- Double-click on the Rand Template.xlsx workbook.
Notice that the file suffix for Rand Template is no longer .xltx but is now .xlsx, indicating that you are no longer working in a template, but rather an Excel workbook of the same name.

Excel opens and you'll see the Rand Template.xlsx name at the top.
You also see the Area, Linear, Segment, and Count labels in cells A2 to A5.

- Click on the PlanSwift Tab
- Click Connect
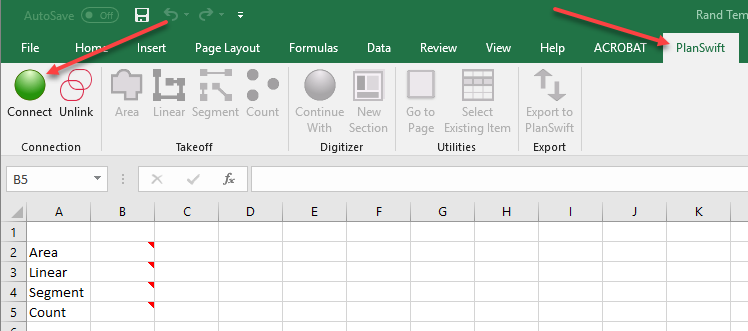
Once connected, the Takeoff Group buttons on the PlanSwift Ribbon-bar Tab become available to initiate takeoffs and perform other actions.

At this point, you now have two options:
- You can either export the Rand Template items into PlanSwift, or
- You can simply perform takeoffs, initiating them from Excel

 Assigning Multiple Properties to a Takeoff Assigning Multiple Properties to a Takeoff | Navigating from Excel Takeoff Values to PlanSwift Takeoff Values  |
Related Articles