
You use Count Conditions to measure takeoff objects best quantified as an each, such as a footing, column, or fixture. If a count object attaches to and/or subtracts quantity from a Linear or Area Condition (think doors, windows, light boxes, etc.), use an Attachment (next article).
On-Screen Takeoff's Auto Count function scans the current Page and automatically finds and takes off multiple occurrences of a selected item/object. Performing manual Counts and Auto Count is explained in Related articles.
General Properties
A Count Conditions General Properties tab is a little different than Linears or Areas. The Shape you choose, determines the Dimension fields available, so we'll start with choosing the appropriate Shape.
We covered Style, Type, Name, Layer, and Condition Number in Related Articles.
Count Shapes
You choose a Count Condition's shape to define how it will appear on the plan when you use it.
Different Shapes allow for/generate different Results (you couldn't select a Result of "both sides" for example on a circle object...) nor could you select "Diameter" for a Square shape or Door.
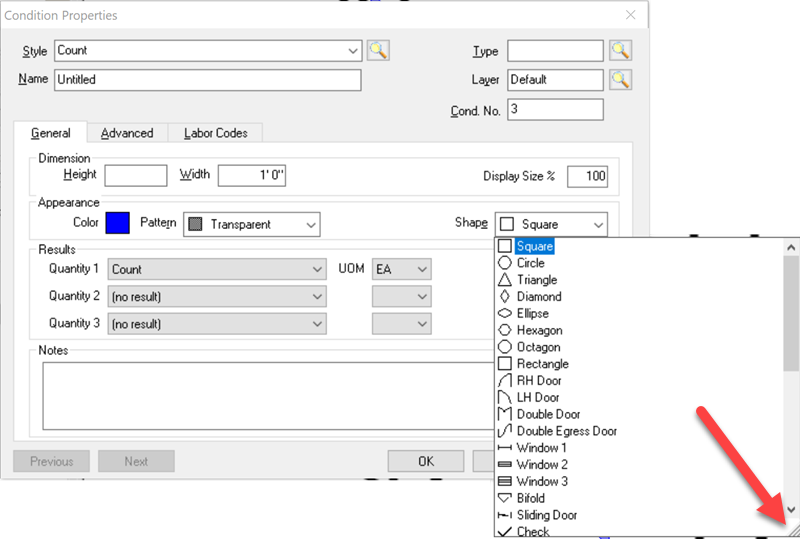
Click the three diagonal lines in the bottom-right corner of the list to adjust the list's height and width, or simply scroll through the list of shapes to select the one you need.
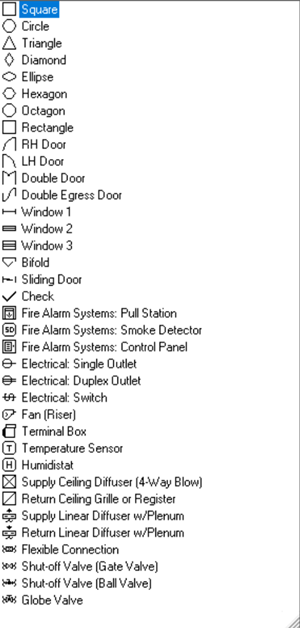
Here are all the possible shapes:
Dimensionality
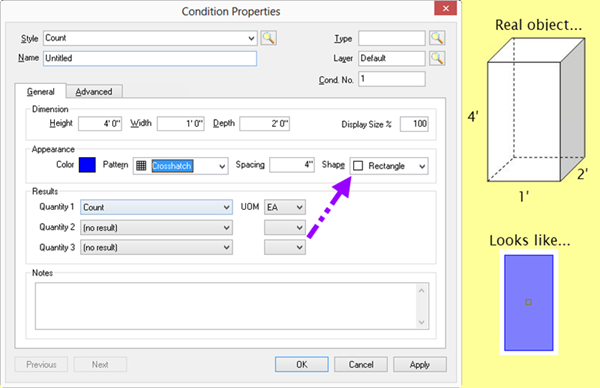
Geometric shapes (squares, circles, rectangles, etc.) are 3 dimensional - meaning they have Height, Width, and Depth. Most shapes require you to specify Height and Width, Rectangles require a Depth measurement in addition to Height and Width. All other geometric shapes are assumed to be 'perfect' meaning their Depth is the same as their Width (as shown below), but a Rectangle can have different measurements for Depth and Width. Dimensions not only affect how the object looks on the screen (when you use it to draw takeoff) but also in the Results calculations (for perimeter, square footage, volume).
When you draw takeoff on a blueprint (orthographic projection, or from a "birds' eye view") using a Count object, the length of the object is the Condition's Height. The width is the Width value, and the depth of the object is how much tall it is. It's a little confusing, but if you think of the Count object being taken off on an elevation, it makes more sense.

Height is required if you want On-Screen Takeoff to calculate Area (what it would take to wrap the object if you could), Volume (what it would take to fill the object, if you could), or cumulative Height for all takeoff objects. Remember, On-Screen Takeoff considers all Count objects to be three-dimensional, unless you set the Height to "0".
"Opening" Count Shapes (doors, windows, etc.) only require Height and Width.
Count Condition Properties - General Tab
This is basic information about your Count Condition such as height/width/dept, color/pattern and the Quantity results required.
- The Dimensions area includes optional settings for Height and Width (and Depth for rectangles). The Dimensions of the object can be used to calculate square footage and volume if needed. The Count object is created from an orthographic projection (birds' eye) view, see the example above for how the Dimensions actually affect the appearance of the Count object as shown in the screen shots below.
- The "Display Size" adjusts the size of the actual takeoff object in relation to its dimensional size. For example, if a column is 2' x 2' on the plans, the estimator can set the Display size to 50% so that the entire column (on the plan) is not covered by the takeoff object.
- In the Appearance section, you set the Color and Pattern of the takeoff objects drawn with this Condition. If you select a non-solid/non-transparent Pattern, you are provided with a field to set the spacing of the pattern.
- Choose the Shape for your Count Condition - Shape is particularly important because it determines which calculations/Results you can choose. Appearance settings determine how objects drawn with the Condition display on the Takeoff Tab, how each Condition looks in the Conditions list, in the Image Legend, and on the Takeoff Tab and Worksheet Tabs.
- Select which Results you want displayed in the Conditions Window. The available Results vary based on the Shape you choose.
- Add whatever notes Notes to document additional details about this Condition such as construction information or material notes.
Count Condition Results
Results are the totals for all the measurements taken for a particular Condition. Results shown in the Condition window are for the current page only. To see the total for all pages, review the Takeoff or Worksheet tabs.
To see Quantities 2 and 3 on the Worksheet Tab, you must select a valid Quantity 1.
There are several Count result options available, depending on the whether the shape is an Area shape (a polygon) or a Linear shape (an opening).
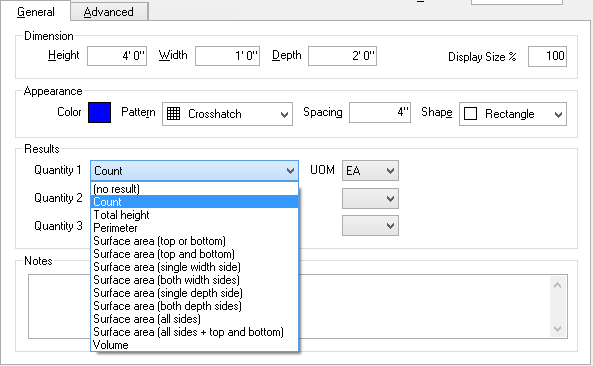
Not every Result is available with every Shape - only those results that can be calculated from a particular shape are listed in the Results drop down for any particular Condition.
The Result selected determines which Unit(s) of Measure are available. This is an example of what various Area and Linear Shapes look like when drawn (each is length/width/depth of 1').
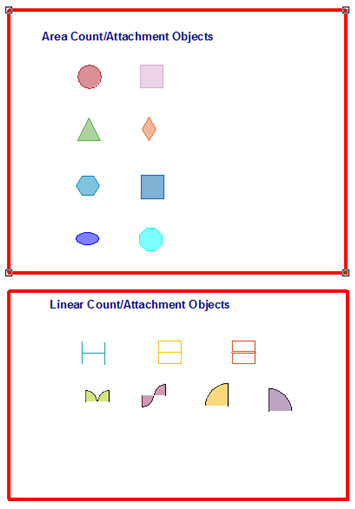
Available Results by Shape
Area Counts/Attachments
| Result | Square | Circle | Triangle | Diamond | Ellipse/Oval | Hexagon | Octagon | Rectangle |
|---|---|---|---|---|---|---|---|---|
| Count | x | x | x | x | x | x | x | x |
| Perimeter | x | x | x | x | x | x | x | x |
| Surface Area (All Sides + top and bottom) | x | x | x | x | x | x | x | x |
| Surface Area (All Sides) | x | x | x | x | x | x | x | x |
| Surface Area (Both Depth Sides) | x | x | ||||||
| Surface Area (Both Width Sides)
| x | x | x | x | x | x | ||
| Surface Area (Single Depth Side)
| x | x | ||||||
| Surface Area (Single Width Side)
| x | x | x | x | x | x | x | |
| Surface Area (Top and Bottom) | x | x | x | x | x | x | x | x |
| Surface Area (Top or Bottom) | x | x | x | x | x | x | x | x |
| Total Height | x | x | x | x | x | x | x | x |
| Volume | x | x | x | x | x | x | x |
Linear Counts/Attachments
| Result | RH Door | LH Door | Dbl Door | DE Door | Win 1 | Win 2 | Win 3 |
|---|---|---|---|---|---|---|---|
| Count | x | x | x | x | x | x | x |
| Perimeter | |||||||
| Perimeter (top + both sides) | x | x | x | x | x | x | x |
| Perimeter (4 sides) | x | x | x | x | x | x | x |
| Surface Area (Both Width Sides) | x | x | x | x | x | x | x |
| Surface Area (Single Width Side) | x | x | x | x | x | x | x |
Result Calculations
| Result | Definition | Calculation |
|---|---|---|
| Count | The number of objects drawn with this Condition on the current page | (C) |
| Total Height | The vertical linear measurement sum of all Count objects drawn with this Condition. | (C)x Height |
| Perimeter | The linear measurement around the area of an object drawn with this Condition. | (C)x(2x((W)+(D))) |
| Surface Area (Top OR Bottom) | The upper or lower surface area of an object drawn with this Condition (depending upon the shape selected). | (C)x(W)x(D) |
| Surface Area (Top and bottom) | The upper or lower surface area of an object drawn with this Condition (depending upon the shape selected). Twice the result of "Surface Area (Top or Bottom)" above. | (C)x2X(W)x(D) |
| Surface Area (Single Width Side) | The surface area of one side of an object drawn with this Condition. | (C)x(H)x(W) |
| Surface Area (Both Width Sides) | Two width surface areas of an object drawn with this Condition. Twice the results of "Surface Area (Single Width Side)". | (C)x2x(H)x(W) |
| Surface Area (Single Depth Side) | One depth surface area of an object drawn with this Condition. | (C)x(H)x(D) |
| Surface Area (Both Depth Sides) | Two depth surface area of an object drawn with this Condition. Twice the results of "Surface Area (Both Depth Sides)". | (C)x2x(H)x(D) |
| Surface Area (All Sides) | The surface area of all sides of an object drawn with this Condition. | (C)x(2x((H)x(W)+ (H)x(D))) |
| Surface Area (All Sides + Top and Bottom) | The surface area of all width, top, bottom and depths combined. | (C)x(2x((H)x(W)+(H)x(D)+(W)x(D))) |
| Volume | The amount of mass of an object drawn with this Condition. Count x Height x Width2 and/or Depth depending on the selected shape. | (C)x(H)x(W2) or, (C)x(H)x(W)x(D) |
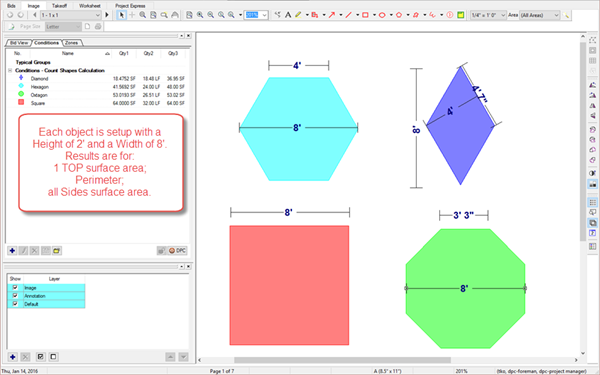
Examples
As examples of calculations, the four Count objects below are all set to a Height of 2' and a Width of 8'. Notice that the Width of some objects is not the same as a segment length. The true segment length is used for all Shape calculations...
Count Condition Properties - Advanced Tab

| Option | What it does/How it is used... |
|---|---|
| Connect and Tolerance | When checked, Count objects will automatically connect to Linear and Area takeoff objects when they are within the Tolerance distance. This is useful for taking off outlets, fire protection devices and other objects that are attached to a linear but do not affect the overall quantities of that linear object (like an Attachment would). Count items do not need to fit on a linear object like Attachment but can move with linear objects, like an Attachment. |
| Display Name | When checked, a label showing the Condition Name is placed next to each takeoff object drawn in the Image window. To adjust the Font/Color of the label, select an individual piece of takeoff and the Text Format toolbar displays. Each label is adjusted separately. Each label is limited to 9 characters, if your Condition Name exceeds 9 characters, it is displayed as "Condition...". |
 Sloped Area Conditions Sloped Area Conditions | Creating Attachment Conditions  |
Related Articles
Create a Condition from scratch - General Condition Properties (What are you measuring?)