
Some images downloaded from a Planroom or received from an Architect can be oriented incorrectly when they are brought into On-Screen Takeoff - they may be upside down, rotated to the left or right by 90°, or even flipped. Also, takeoff pasted to a page that has a different rotation that the original page may need to be rotated. If you need to rotate or spin takeoff (after copying and pasting for example) to match the plans, see Related Articles.
Base vs. Overlay
Rotating or flipping a base image stores a setting in the database that tells the program to make the adjustment to the display of the base image. The base image is not altered.
However, adjusting an overlay image changes the overlay file itself. If you add an overlay on the Takeoff Tab, using the “Add Overlay” function, a copy of the file is created in an “Overlay” folder, however if you bypass that workflow and add your overlay on the Cover Sheet, no copy is created. Adjustments to an overlay are made to the file itself - if you use this file as the base image on another Page, you may alter it and cause takeoff to no longer match the plan.
Page vs. Takeoff
When you rotate a Page, if it contains takeoff, that takeoff is rotated right along with the Page. However, if you want to only rotate takeoff you can do that without rotated the Page (the options are in the same menu). When you rotate just takeoff, if rotating it would cause it to no longer fit on the Page (Horizontally or vertically), you will be prevented from rotating the takeoff. See Related Articles for details on rotating takeoff.
Now, if you want to rotate the underlying Page without rotating the takeoff, you can open the Cover Sheet, duplicate the Page, navigate to the new Page, rotate it, and then copy/paste all the takeoff over. If it fits, it will be pasted over in its normal orientation, if the pasted takeoff will not fit (horizontally or vertically), you will be prevented from pasting it onto the new page.
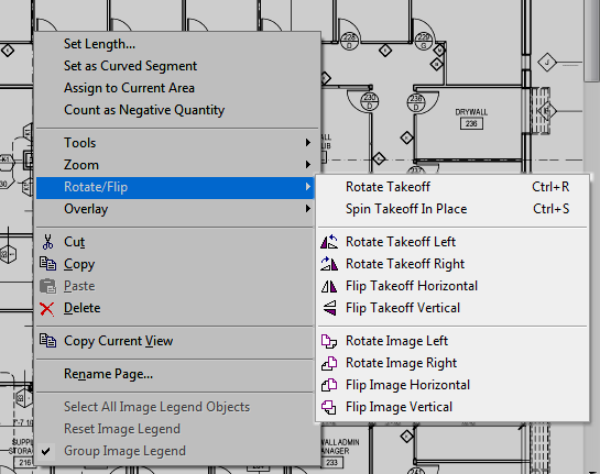
To rotate a single image using the Context Menu, right-click on within the Image Window and select Rotate/Flip to access the Rotate Image (and Rotate Takeoff) options. These options are duplicated on the Rotate toolbar. When an overlay image is assigned or if the Bid is in DPC Mode, the Rotate/Flip options are not available.
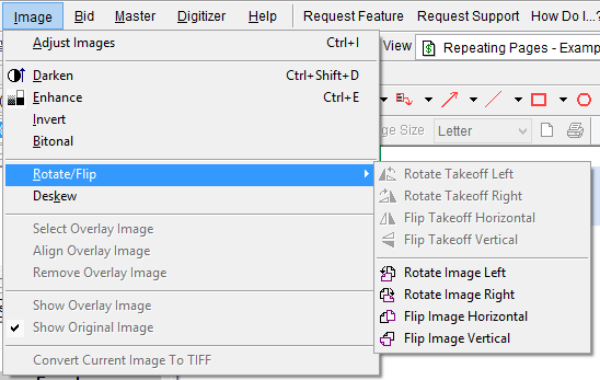
These controls are also available by clicking Image > Rotate/Flip.
And in the Adjust Images dialog box (press <CTRL> + I or click the Image Adjust button  ).
).
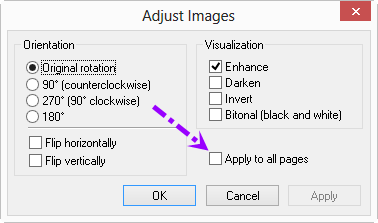
To rotate/flip all images in a project at once, check "Apply to all pages"
The Image Toolbar

Rotating spins the image (or takeoff) 90 degrees in the indicated direction.
Flipping flips the image (or takeoff) end-over-end - it this is not the same as rotating the image (or takeoff) 180 degrees.
| Button | Description | What it does/How it is used... |
|---|---|---|
 | Convert to TIFF | Converts the current image file to TIFF, you'll be prompted to convert all Pages backed with the same image file type (PDF, for example) |
 | Rotate Image Left | Rotates the image 90 degrees left (counter-clockwise) |
 | Rotate Image Right | Rotates the image 90 degrees right (clockwise) |
 | Flip Image Horizontal | Flips the image horizontally (on the vertical (up/down) axis) |
 | Flip Image Vertical | Flips the image vertically (on the horizontal (side to side) axis) |
 | Adjust Plan(s) | Opens the Adjust Images dialog box (explained above) |
Follow-the-Leader Rotation
If you rotate or flip (or Zoom Full Page) two consecutive pages the same way using the rotation buttons, On-Screen Takeoff prompts you to apply that same rotation to the remaining pages in the project.
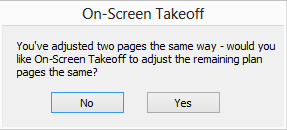
If you choose "No" (the default), On-Screen Takeoff will not prompt you again for this Bid during this session of the program again unless you rotate two more consecutive pages.
Follow the Leader also applies to Zooming to "Full Page".
 Adjusting How Plans are Displayed Adjusting How Plans are Displayed | Deskewing Plans  |
Related Articles