After you deskew and resize your overlay (or if you add an overlay via the Cover Sheet or skip the Overlay Wizard altogether), your base and overlays may not be aligned (vertically or horizontally).
When you zoom very closely into a page (high zoom %), the base image and overlay may not 'grey out' completely - this is expected. Every page is slightly different at high zoom and On-Screen Takeoff shows exactly what is different, down to the pixel - there is nothing wrong with the images or the program. The Overlay feature is designed to call out overall changes to a plan to assist an estimator in identifying plan/project changes.
Aligning Overlays
If the Base image and overlay is slightly out of alignment but the same size, then use the Alignment Tool to nudge or rotate the overlay.
- Right-click anywhere on the image and choose Overlay > Align Overlay Image or click the Align Overlay button
 on the Overlay Toolbar.
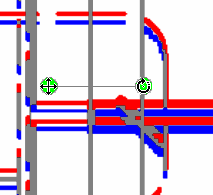
A line with green circles at either end is added to your plans - this is the Alignment Tool.

- The move handle
 moves the overlay image up-down and side-to-side - the arrow keys on the keyboard can nudge the overlay image if the alignment is only slightly off
 - The rotate handle
 spins the overlay image along the center axis
Adjust the image until it is predominately grey (a purplish grey). Once the base and overlay images are aligned, deletions are shown in RED and additions in BLUE. Adjust takeoff as needed to account for the changes in the overlay.
See previous articles for step-by-step instructions on using the Deskew and Resize Tools
Adjusting base images stores settings in your database that tells the program to make the adjustment to the display of the base image, when it is loaded on the Image Tab. The base image is not altered. However, adjusting an overlay changes the actual overlay image file.
 Resizing Overlays to Match the Base Image Resizing Overlays to Match the Base Image | Adding Multiple Overlays to a Bid (using the Cover Sheet)  |
Related Articles
