
It is important to understand how to get around the Digital Production Control (DPC) interface - which buttons do what, how to set percents, how to send/receive information. In the next few articles, we will talk about the program itself - please take a few minutes to familiarize yourself with the DPC controls, menus, and toolbars.
There are seven toolbars available in Digital Production Control: Main, Navigation, Tools, Zoom, Work Date, Quick Takeoff (Measurements), and Annotations. The Main, Navigation, Tools, Zoom, and Annotation toolbars are the same as On-Screen Takeoff.
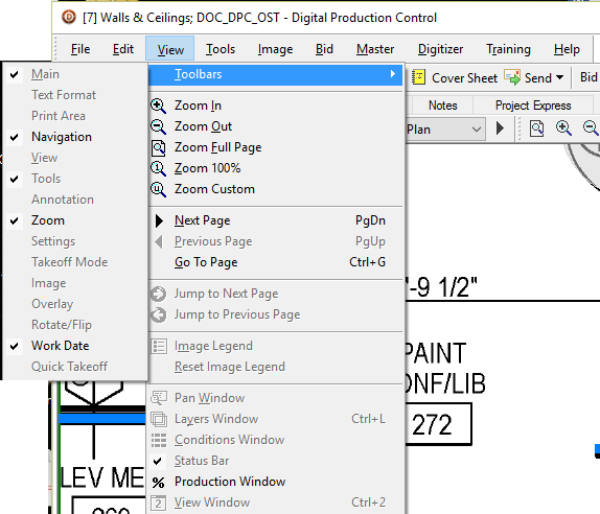
Many Toolbar functions are repeated on the File, Edit, View, Tools, Image, and Bid menus, discussed in the next article.
Anytime you are wondering what a button does, just hover your mouse pointer over the button - you will see a tool tip identifying what the button does.
Main Toolbar
The Main toolbar provides application functions such as opening databases, printing, and deleting. Some functions are not available depending on your license and role.

| Button | Name | What it does/How it is used... | Shortcut Key |
|---|---|---|---|
 | New | The New button is a multi function button - you can add a new condition, database, bid, or child bid, or folder, depending on your current focus. | <Ctrl> + <O> |
| Open | Opens the Open Databases window. | <Ctrl> + <O> | |
| Prints whatever currently has focus. | <Ctrl> + <P> | ||
| Print Preview | Previews whatever has focus (before sending to a printer) | <Alt>, < F>, <V> | |
| Delete | Deletes whatever currently has focus. Be careful when deleting - some deletions are permanent and cannot be 'undone' | <Delete> Key | |
| UnDo | Undoes the last action | <Ctrl>+ < Z> | |
| ReDo | Redo the last UnDone action | <Ctrl> + <Shift> + <Z> | |
 | Cover Sheet | Opens the Cover Sheet for the selected project. | |
| Send | Allows user to send the project or DPC Changes to another user. | ||
| Bid View Indicator | Displays the Base Bid or accepted Change Order name current selected in the Bid View tab. You can also use the Bid View tab in the Cost Code window to quickly switch between a Bid and its Change Orders. |
Navigation Toolbar
The Navigation Toolbar is how you flip through the pages of your project. You can use the drop down list to select a specific page; use the black arrow keys to go to the next or previous page or; use the green Back/Forward buttons; or to go to the last view. When you click on the Pages Drop Down list, you can use the scroll wheel on your mouse to quickly cycle through the pages.

The drop down lets you choose a specific page quickly (hit Ctrl+G to open a "GoTo" box).
When you have the Pages drop down open, you can use your mouse's scroll wheel to cycles through the pages very quickly.
| Button | Name | What it does/How it is used... | Shortcut |
|---|---|---|---|
 | Back | Last view (may be a different page or a different zoom) | |
 | Forward | Return to the previous view after the Back button (above) is used | |
| Previous Page | Go to previous page in project | <Page Up> | |
| Next Page | Go to next page in project | <Page Down> |
Before sending a job the field, collate the pages to maximize the foreman's efficient. See Related articles for information on preparing a job for DPC.
Tools Toolbar
The Tools Toolbar houses basic application function buttons for interacting with the plan/takeoff on the Image Tab.

| Button | Name | What it does/How it is used... | Shortcut |
|---|---|---|---|
| Select Mode | Selects objects or takeoff | <Spacebar> | |
| Takeoff | Performs takeoff | <Spacebar> the Spacebar toggles between the Takeoff and the Select Tools | |
 | Zoom (to Region) Tool | Used to Zoom In or out on the current page - left-click to Zoom In and right-click to Zoom Out or rope an area to zoom into it | <Ctrl> + Left (IN) or Right (OUT) mouse button Scroll Wheel on mouse |
 | Zoom Full Page | Zooms to a full page view of the current page (fits to page) | <*> |
| Magnify Tool is a rectangular magnifying glass | Magnify is a tool used to magnify a region of a plan without zooming in. Select the tool and click on the area to magnify. | ||
| Pan Tool | Click and drag to pan around the image | <Alt> + Scroll Wheel up/down < Shift> + Scroll Wheel - side to side |
Zoom Toolbar
The Zoom Toolbar changes how the image is currently displayed to see more/less detail as needed.

| Button | Name | What it does/How it is used... | Shortcut |
|---|---|---|---|
| Zoom Full Page | Sets zoom so the full page is viewable in the Image Window | <*> |
 | Zoom In | Zoom in one level | <+> or < Ctrl> + Right-click or < Ctrl> + Scroll Wheel forward |
 | Zoom Out | Zoom out one level | <-> or < Ctrl > + Left-Click or < Ctrl> + Scroll Wheel backward |
 | Zoom 100% | Zooms to 100% (full size) of the current page based on the page size | </> |
 | Custom Zoom | Custom Zoom to a customized percentage. User sets the percentage by typing the amount or selecting from the drop down list. | |
 | Zoom drop-down | The Zoom drop-down allows you to select from a list of predefined zoom levels. |
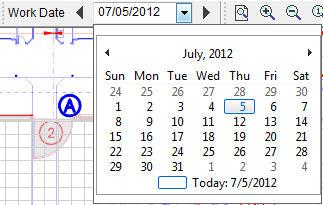
Work Date toolbar
The Work Date Toolbar allows the user to select a specific time period for the Takeoff (Percenting), Budget, and Timecard Tabs.

Clicking the black forward and back arrows changes to the next/previous week. Clicking the drop down arrow next to the date opens the Calendar widget where a particular date can be selected.
Quick Takeoff (Measurements) Toolbar
The Quick Takeoff Toolbar is available to DPC-Foreman licensees. With these tools, a user is able to take simple linear, area, or count measurements but these quantities are not stored in the project (when you switch tools or leave the page, the values are cleared). You must switch to "TKO Mode" to use quick measurements.

| Button Icon | Description | What it does/What it means... |
|---|---|---|
| Line | Measure a linear object or objects | |
| Area | Measure area objects | |
| Count | Count a number of objects | |
| Quantity | Indicates measurement quantity | |
| Delete | Deletes all measurements | |
 | Units | Select unit of measure to use |
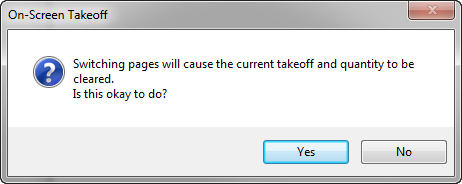
Quick Takeoff Quantities are cleared when you...
- Select a different measuring tool (going from Line to Area, for example)
- Switch pages
- Close the program or open a different project
The Quick Takeoff Toolbar is only active when the product is in PlanViewer (no-License) mode or in a Project in DPC mode, and if the user only has a DPC-Foreman license. If you are a takeoff-licensed user, you have access to many more robust tools.
Annotation Toolbar
The Annotation Toolbar includes options to add Text, Callouts, Highlighting, Dimension lines and Hotlinks/Named Views to a project. These elements are considered Annotation because they do not affect the takeoff quantities - they are simply markups on the image to call out important information or make the plans easier to navigate.
Annotation is not considered "takeoff". When exporting a Project/Bid and selecting "Pages with Takeoff" only, pages that contain only Annotation (no Condition takeoff) would not be included if the export. To include these pages, create a "dummie" Count Condition and place a single count on each page to include in the export.

By default, this toolbar is docked to the right of the Tools toolbar.
| Button Icon | What it does/What it means... | Function |
|---|---|---|
| Dimension Tool | Creates dimension line | |
| Text Tool | Insert text | |
 | Highlighter Tool | Highlight object or text - click the drop down to select a color (defaults to yellow) |
 | Callout Tool | Draws a text box with an attached arrow to draw attention to something important on the plan (defaults to red) |
| Arrow Tool | Draws a single-ended arrow (defaults to red) | |
 | Line Tool | Draws a line (defaults to red) |
 | Rectangle Tool | Draws a rectangle (defaults to red) |
 | Oval Tool | Draws an oval (defaults to red) |
 | Freehand Tool (Polygons) | Allows an estimator to click several points surrounding a region of the plan and draws a border around the region (defaults to red) |
 | Cloud Tool | Allows an estimator to click several points surrounding a region of the plan and draws a cloud around the region (defaults to red) |
 | Ink Tool | Allows an estimator to draw freehand markups on the plan |
| Hot Link | Creates Hot Links | |
| Named View | Creates Named Views |
See Related Articles for more information on using the Annotation tools.
 Getting Around DPC - Shortcuts Getting Around DPC - Shortcuts | Program Menus  |
Related Articles