
Now that you have your new Starter Pack installed, you’ll want to use the information to create components to finish estimating your bids.
You must test and verify any modifications you make to a Starter Pack to ensure quantities and calculations are accurate. PlanSwift cannot verify the accuracy of modifications you make to templates, parts, and assemblies.
- Copy and Paste an Assembly
- Copy and Paste Parts
- Drag and Drop Parts
- Frequently Asked Questions about Starter Packs
Copy and Paste an Assembly
The purpose of copying and pasting an assembly is to allow the user to copy and then modify the assembly for later use. As an example, you may want two different assemblies: one might include a part, and another might have an alternative part or not include that part at all. By copying one assembly and then modifying and renaming the copy (for easy identification), you can have two different assemblies available, allowing for easier and faster takeoffs.
The screenshot below shows the Templates Tab (arrow 1) and the Area Takeoff Item Example 1 assembly (arrow 2). If you want to add another assembly but with no Material 3
- Click on the assembly you want to copy (arrow 2)
- Click Copy (arrow 3)
- Click Paste (arrow 4)

The next screenshot shows the original (arrow 1) and new Area Takeoff Item Example 1 assembly (arrow 2).
To delete the Material 3 (arrow 3) from the newly created Area Takeoff Item Example 1 assembly (arrow 2),
- Click on “Material 3” (arrow 3)
- Click on Delete (arrow 4)
- Click on Ok in the popup window to confirm the deletion

Now you see the two assemblies, one with (arrow 1) and one without (arrow 2) the Material 3 item.
You can now change the description of the duplicated Area Takeoff Item Example 1 (arrow 3) without the Material 3 item.
- Double-clicking the duplicate Area Takeoff Item Example 1 (arrow 3)

This opens the Properties – [Area Takeoff Item Example 1] window.
- Change the assembly’s name to something like Area Takeoff Item Example 1— No Material 3 to make it easier to identify
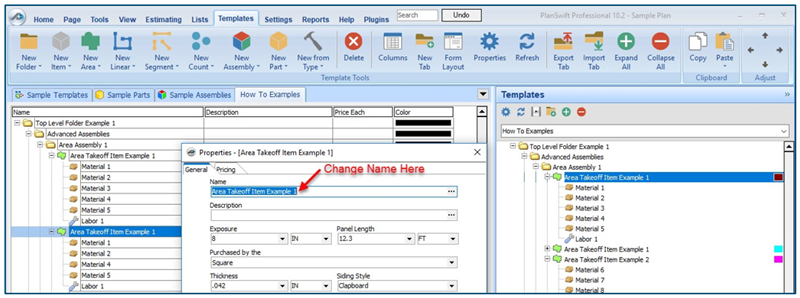
- Click on Ok in the Properties window after you have entered the name
The new name displays in the Assemblies list.

To perform a takeoff with the Area Takeoff Item Example 1—No Material 3 assembly,
- Navigate to the Page where you want to draw takeoff
- Click on the green Record Button in the Templates sidebar window
- Then, draw your takeoff

Copy and Paste Parts
Copying and pasting parts is handled similarly to copying and pasting an assembly. If, for instance, you want to move Material 6 in Area Takeoff Item Example 2 to Area Takeoff Item Example 1,
- Click on Material 6 (arrow 1)
- Click Copy (arrow 2)

There are now two ways to paste the part. The first is to paste it at the same hierarchical level of a selected item, and the second is to paste it as a sub-item of a selected item.
The screenshot below shows the Paste button.
- Clicking the top half of the button to paste the part at the same hierarchical level of a selected item
- Click the dropdown half of the button, and select As Sub-Item to paste the part as a sub-item of the selected item

- Click on Area Takeoff Item Example 1
- Click on the top half of Paste
Material 6 gets pasted at the same hierarchical level as Area Takeoff Item Example 1:

Or, if you pasted Material 6 as a sub-item:

Another way to adjust the hierarchy of an item, such as Material 6, is to use the Main Ribbon bar arrow Adjust keys.

The left and right Adjust arrows move the item left and right (up or down) in the hierarchy, and the up and down Adjust arrows keys moves the item higher and lower in the list of items.
A shortcut to the Copy and Paste and Past as Sub-Item selections is available with a right-click menu:

Drag and Drop Parts
Parts may be dragged and dropped from one assembly to another assembly.
If, for instance, you want to drag the Material 8 item from Area Takeoff Item Example 2 up to Area Takeoff Item Example 1,
- Click on Material 8
- Drag it up to just below Material 6A
- Release the mouse button
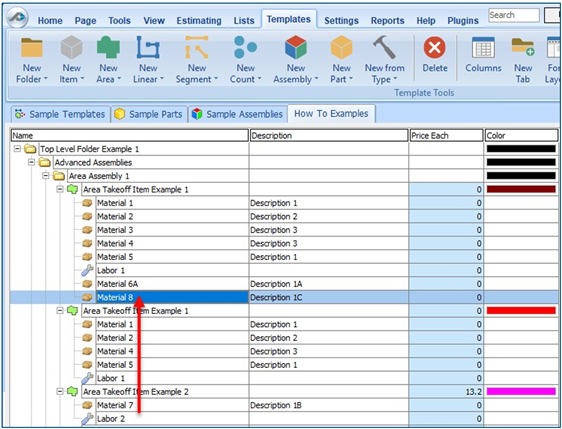
Notice that dragging the part this way moves the part from the Example 2 assembly to the Example 1 assembly, not leaving behind a copy.
The Templates sidebar window is a summarized view of everything in the Templates Tab. It is designed for easily dragging and dropping parts and for quickly launching takeoff templates and assemblies.
Parts may be dragged over from the Templates sidebar window into the Templates Tab window; note that dragging any part from the Templates sidebar window makes a copy of it. If, for instance, you want a Material 7 item added to Area Takeoff Item Example 1 as a sub-item, simply drag the Material 7 from the right Templates sidebar window over on top of Area Takeoff Item Example 1 label and release the mouse button. (Figure C2).

This screenshot shows the Material 7 item in place after it was dropped on top of Area Takeoff Item Example 1. In addition, the Properties – [Material 7] window automatically opens, allowing the user to change any properties for Material 7.
- Click on Ok to close the Properties – [Material 7] window
Frequently Asked Questions about Starter Packs
- I’ve read this article, but I still have questions. What do I do?
- PlanSwift recommends that you purchase a training package. We highly recommend new users purchase a training package, because training is customized to each user. Contact PlanSwift® Training Department Training-ops@ConstructConnect.com.
- Does the Starter Pack include everything a contractor will need to generate an estimate?
- No. A Starter Pack is a tool to get you started toward creating a complete estimate. For example, the Starter Pack does not include industry pricing for materials and labor. However, you can supply prices for materials and labor on the assemblies and labor included in the Starter Pack.
- Do I have to input all the pricing for all my parts?
- Inputting pricing is optional. You can use the Starter Pack to generate quantities that you can then send to your supplier, who can then provide you current pricing. Inputting pricing on your own is optional. If your industry’s pricing is not subject to frequent changes, you may want to consider inputting your pricing in PlanSwift.
Related Articles