The Overlay tool allows you to place, or overlay, a separate page from your plans onto the page that you are currently viewing.
The Overlay tool is on the Home Tab’s ribbon bar, in the Annotations section.

Using Overlay
- Navigate to the Page on which you want to overlay another drawing
- Click the Overlay button
The Overlay dialog box opens.

- Select the type of overlay you want to create:
- Standard Overlay - Places a second page on the current page you are viewing, usually for comparing the two images.
- Comparative Overlay - Places a revised plan over the original plan. This will let you view revisions made to the plan. Additions are shown in red (unless you change the Overlay color), and deletions are shown in blue.
- Click the Next button to continue

- Select the page you want to overlay from the menu - you can select the page by clicking on it, or you can search your job to help find the page
- Change the color from the Default (red) if you like
The image file/plan must exist this Job to be added as an Overlay. If you need to add a Page to an existing Job, see Related Articles.
A Confirm window asks if you want to align the overlay.
- Click on Yes if your Overlay is not aligned or No if it looks good

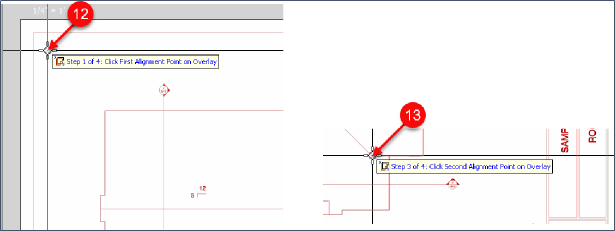
You are now prompted to click the first alignment Point on the overlay.
- Click an upper-left point on the Overlay (that also exists on the Base page)
- Three more steps have you aligning the overlay, clicking the second Point, and aligning the second Point so that the overlay is exactly over the original plan

Aligning Overlay
If you skip aligning your overlay or if you don't line it up correctly,
- Hover over the new overlay in the Pages, Booksmarks window until the re-do button appears (14)
- Click on the button and start the four alignment steps over again

You can zoom and pan as normal while performing the alignment steps.
- Click Finish to Continue

To turn the overlay on or off, click the light bulb icon next to its name in the Pages, Bookmarks list.
Set the Overlay Color
You can select what color you would like the overlay to be after you add it. If you want a different color,
- Click on Pages, Bookmarks,
- Click the colored box next to the overlay
- Select the desired color

Here's a video that shows how to use the Standard Overlay tool:
And here's one for Comparative Overlay:
 Annotation - Image Tool (adding a snapshot to a Page) Annotation - Image Tool (adding a snapshot to a Page) | Annotations - Revision Clouds  |
Related Articles
