
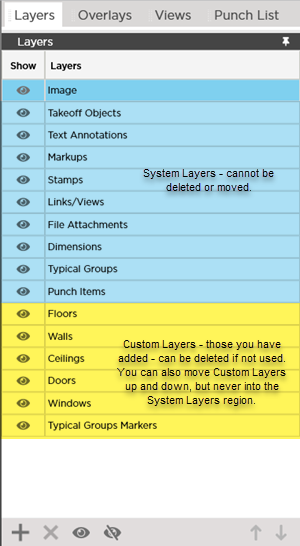
The Layers Pane displays all the Layers where objects are stored in the bid.
- System Layers (those built-in) are highlighted in blue (in the screenshot below)
- Custom Layers (Layers you create the organize your Takeoff Items and takeoff) are highlighted in yellow
Takeoff Item Layers
In addition to System and Custom Layers, each Takeoff Item is its own "layer" in a way - you can show/hide individual Takeoff Items' takeoff by clicking the show/hide control to the left of the Takeoff Item Name in the Takeoff Item Pane (did we just rhyme there?). See Related Articles for more information.
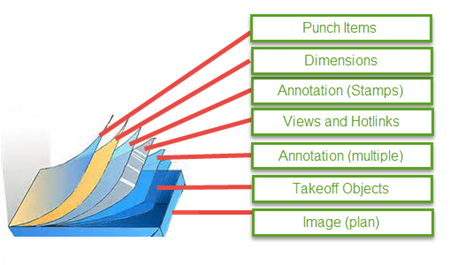
Layers are similar to transparent sheets laid over your plan (which itself is on the Image layer). These layers show all the takeoff and annotation you've drawn on a Sheet but also allow you to show/hide objects you may not need or want to see at any given time.
You can show or hide any layer you wish. Hiding a Layer does not delete or change any object assigned to that Layer it just instructs the program not to display objects stored on that Layer. Hiding a Layer does affect printing though - only Layers set to "Show" are printed (WYSIWYG or What You See Is What You Get). There is a Layers control built into the Print Preview Window so you can turn Layers on and off to see how they affect printing before you print.
The Layers shown highlighted in blue in the screenshot above are called "System Layers". These layers are added to every bid automatically and cannot be deleted modified or moved up or down in the list. System Layers can be shown/hidden however just like any other Layer. You can create Custom Layers for different types of Takeoff Items - in our example above we created Floors Walls Ceilings Doors Windows and Typical Group Markers. You may want to create a Layer for a specific Division or Section or any other way you want to organize and show/hide your takeoff. We cover using Layers in the next Chapter when we discuss creating Takeoff Items because you assign Takeoff Items to Layers then all their takeoff gets put on that Layer.
Using Layers allows you to assign multiple Takeoff Item to one Layer so you can show/hide all the Takeoff Items of a certain type. Every Takeoff Item is also its own Layer in a way. Remember each Takeoff Item in the Takeoff Items Pane includes its own show/hide control so you can hide all the takeoff for a single Takeoff Item or all Takeoff Items very quickly. If you do not assign a Takeoff Item to a custom Layer its takeoff goes on the "Takeoff Objects" Layer but if you go back and change the Layer to which the Takeoff Item is assigned all its takeoff is moved to the new Layer automatically.
Annotation objects are all stored on individual Layers - all text boxes for example are stored on the "Text Annotations" Layer and all Named Views and Hotlinks are on the "Links/Views" Layer. Annotations cannot be assigned to custom Layers they are stored on their unique System Layers always.
Layers List Toolbar and Shortcuts

| Keystroke | Button | Description | What it does/Description... |
|---|---|---|---|
| Insert |  | Add Layer | Add Custom Layer |
| Delete |  | Delete Layer | Deletes the selected Layer(s) - you can only delete unused Custom Layers meaning you have not assigned any Takeoff Items to the Layer and the Layer is not one of the "system" Layers |
| Ctrl + L |  | Show All | Shows all Layers - toggles all Layer "on" so you see every objects on the plan except for those Takeoff Items Layers you turn off individually |
| Ctrl + H |  | Hide All | Hides all layers - toggles all Layer "off" so you won't see any objects assigned to any Layer (System or Custom- overrides the show/hide selection on the Takeoff Item itself) |
| Ctrl + U |  | Move Up | Moves the selected Custom Layer one position up in the list |
| Ctrl + D |  | Move Down | Moves the selected Custom Layer one position down in the list |
 Typical Groups Pane Toolbar, Context Menu, and Keyboard Shortcuts Typical Groups Pane Toolbar, Context Menu, and Keyboard Shortcuts | Using the Overlay Pane to Select and Remove Coordination Overlays  |
Related Articles