
The Plan Set Editor Grid
The Plan Set Editor grid shows a row for each Plan in the current Plan Set grouped by Discipline.
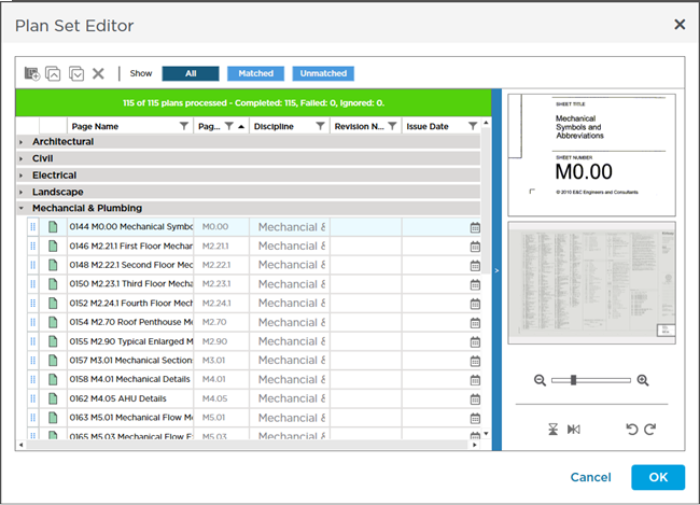
Each Plan's Discipline defaults to the name of the folder in which the image file was stored when it was added to the Plan Set. The Plans in the Plan Set shown above were added from this set of image files stored on our computer:

Notice each Folder becomes a Discipline.
Controls
| Control | What it means/How it is used... |
|---|---|
 | This is the Drag and Drop handle - at the head of a Plan Row this handle allows you to drag-n-drop a Plan to a different Discipline in the Plan Set. |
Columns
The Plan Set Editor Grid is setup similar to a grouped spreadsheet. Each plan is a row within the grid and plans are grouped under Discipline rows (that can be expanded or collapsed).
| Column | What it means/How it's used |
|---|---|
| Page Information | |
| First column | This is a placeholder column for the Drag and Drop handle (above). |
| Second column | Displays the Plan processing status indicator: Green - Processed Successfully the file associated with this page was converted to a TIFF and is ready to be uploaded to the Cloud. (Plan are uploaded when you click "Save") Green - Processed Successfully the file associated with this page was converted to a TIFF and is ready to be uploaded to the Cloud. (Plan are uploaded when you click "Save") Blue - Processing the file is being converted to TIFF. Blue - Processing the file is being converted to TIFF. Red - Processing Failed you must remove this file from the Plan Set before you can save it - you can then review the original files to determine why this particular file could not be converted to TIFF. Red - Processing Failed you must remove this file from the Plan Set before you can save it - you can then review the original files to determine why this particular file could not be converted to TIFF. Orange - Pending Processing ConstructConnect Takeoff has not begun converting this file yet. Orange - Pending Processing ConstructConnect Takeoff has not begun converting this file yet. |
| Page Name | The name you want shown in the Plan Organizer grid and in the Page Navigator (on the Takeoff Tab). By default the program uses the file name as the Page Name.The Plan Set Editor allows you to preview each Page and we recommend that you update the Page Name based on the drawing's Title Block (for example "Floor Plan - Bldg A" or "Site Plan" or "Mechanical Plan 1" so that you can easily navigator Pages in the Page Navigator. We explain why it is so important to update your Page Name and Page No. in the next article. |
| Page No. | By default the Page No. is a sequential number starting at 000001. As you add Revisions (different plan sets or issues) to an existing project you match the new issue to existing Pages using the Page No. - this way when you are on the Takeoff Tab you can view all the revisions/versions of a Plan in one place. You can also use Overlays to compare revisions to see what has changed. Revisions and Overlays are discussed in Related Articles - advanced learning but if you are using a project from ConstructConnect Project Intelligence much of the work is done for you automatically. We recommend you update the Page No. for every Page to the Drawing Number (or Page Code Index Number) shown in the Title Block for the Plan. For example: A2.41 CS0001 E101 M-300 etc. because this makes matching up different revisions much easier. The Page No. can be shown in the Page Navigator on the Takeoff Tab. We explain why it is so important to update your Page Name and Page No. in the next article. |
| Discipline | By default the Discipline for each Page is based on the folder name in which the image file was located when the Plan Set was added to the project (for example a typical set of plans likely includes "Architectural" "Mechanical" "Site" "Electrical" etc. in subfolders - the "Discipline" is set based on the name of each subfolder). You can change a Page's Discipline to anything you want - you can type in something new or use the drop down to select an existing Discipline.NoteThe Plan Set Editor Plan Organizer and the Takeoff Tab are grouped by Discipline if you set the Discipline correctly navigating Pages is easier and more efficient because like Pages are grouped together. |
| Revision No. | The Revision No. is a number you give to a Plan when you add it to a Plan Set. Typically you leave Revision No. blank for the initial (original) Set and then start counting up for each Revision Set you add.  Use the Copy Down button to apply the same Revision information to all Pages below this one. |
| Issue Date | When you add a Plan Set you can specify the "Issue Date" for each Page - you can also just add the date to the Plan Set Name when you save the set. |
Each Plan Set you add in the Plan Set Editor becomes a "Revision" column in the Plan Organizer for this Project.
When you are working with Plan Sets your changes are not committed nor the files uploaded to the Cloud until you click SAVE in the Plan Organizer.
Next up some reasons why being thoughtful and deliberate when naming Pages is important.
 The Plan Set Editor Toolbar, Context Menu, and Shortcuts The Plan Set Editor Toolbar, Context Menu, and Shortcuts | Update Page Names and Numbers to Make it Easier to Navigate Plans  |
Related Articles