
The Takeoff Tab is where you view your plans and measure the various building objects. This is where you see your Pages (sheets plans drawings) create Takeoff Items (for measuring) Areas and Typical Groups and Typical Areas draw takeoff and annotation and manage your Punch List items.
You will spend a lot of time on the Takeoff Tab so learning about the various windows toolbars and tools available (described briefly here and covered in great detail in Related Articles) is critical.
The Takeoff Tab includes several key regions each described briefly below.
By default the Takeoff Items and Typical Group Panes are docked and pinned open on the left and the Plan Organizer Overlays Layers Punch List and Views Panes are docked and collapsed on the right.
You can organize these Panes however you like. Each Pane can be docked on either side of the Takeoff Tab or even undocked and moved to a different monitor if you like.
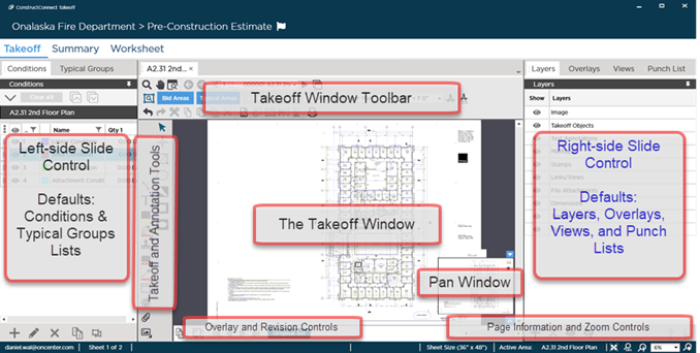
The "Panes" that are parked/docked on the left and right sides of the application can be shown/hidden and docked/un-docked individually. If you have multiple monitors un-docking these controls to a different monitor lets you maximize the space available for the Takeoff window (where your plan and takeoff are shown). Un-docked panels "remember" where they were when you close/reopen the program.
A Quick Look...
| What | Where you find it | Description/What it does or how it is used |
|---|---|---|
| Application toolbar | Top of application | Includes the current project name and buttons for Alerts Settings and Help. The "Current Bid" is identified by a Flag next to its name. ("Current Bid" is explained in the next chapter). |
| Program Tabs | Below the Application toolbar * | Allows you to switch between the Takeoff Summary and Worksheet Tabs for the open Bid. You can "undock" a Tab by "ripping" it off the Window. |
| Takeoff window (docked) | Front and center on Takeoff Tab | The Takeoff window shows you your Drawing (called a "Sheet") and any takeoff and annotation you've drawn on the Sheet. You can open up to ten Takeoff Windows for each Bid you have open however each open Window draws significant computer resources. Each Takeoff window includes its own toolbars... |
| Takeoff window toolbar(s) | At the top of each Takeoff window | Provides access to Sheet navigation Bid/Typical Areas Page Scale and other tools. If you undock a Takeoff window it gets its own Takeoff Window Toolbar. |
| Takeoff Tools and Annotations Toolbar | To the left of the main docked Takeoff Window | All the Takeoff Tools and Annotation Tools you can use on a Plan/Sheet. The Takeoff Tools change depending on which Style (Linear Area Count) of Takeoff Item is selected. All Takeoff windows share a common Takeoff/Annotations Tools toolbar it always remains docked to the main window. |
| The Left Slide Control * | ||
| Takeoff Items List (former called "Conditions") | Left side of app slid out (visible) by default | The Takeoff Items panel shows you all the Takeoff Items you've created in the current Bid. From this panel you can add modify delete and duplicate Takeoff Items and even store them as "templates". Takeoff Items are explained in the next Chapter. The Results shown are for the current Sheet only - to see cumulative Results check out the Summary or Worksheet Tabs. |
| Typical Groups List | Left side of app slid out but behind Takeoff Items panel by default | The Typical Groups panel shows you all the Typical Groups you've created in the current Bid. This does not show if a Typical Group is used on other Sheets. You can add modify and delete Typical Groups from this panel. |
| The Right Slide Control * | ||
| Plan Organizer panel | Right side of app slid in (not visible) by default | Allows you to view modify and add Plan Sets right from the Takeoff Tab. |
| Layers panel | Right side of app slid in (not visible) by default | Layers allow you to organize your takeoff so you can show/hide just what you want to see/print. The Layers panel shows you all the "System" (the default ones that cannot be modified) and all the "Custom" layers you create. |
| Overlays panel | Right side of app slid in (not visible) by default | The Overlays panel is used when you add a "conflict" or "collision" overlay to the current Sheet. |
| Views (Named Views) panel | Right side of app slid in (not visible) by default | The Views panel shows you all the Named Views you've defined in the Current Bid. Named Views are a great shortcut to sections of Sheets such as Details Cross-sections or Elevations. You can quickly navigate to the Sheet where the Named View exists from this list or using the Hot Link place a shortcut to a Named View on any Sheet in the current Bid. |
| Punch Items panel | Right side of app slid in (not visible) by default | The Punch Items panel shows you all the Punch Items you've created in the Current Bid. You can quickly navigate to the Sheet where the PI exists from this list. |
| Pan Window/Control | Bottom-right corner of Takeoff window. * | Shows the relative position of the current view in the Takeoff window to the entire Plan/Sheet. |
| Bottom of each Takeoff window | ||
| Overlay and Revision Controls | Bottom of each Takeoff window toward the left | Allows user to select which Revision of a Sheet to view and which two to compare using Overlay. Revisions and Overlay are detailed in Chapter 7. |
| Page Info and Zoom Controls | Bottom of each Takeoff window toward the right | Shows details about the current Page/Sheet such as dimensions and name and provides access to the Zoom controls. |
* These are the Default configurations and locations for the application. You can customize where these controls are docked and show/hide them as you choose. See Related Articles for more information about docking and showing-hiding panes.
 A Project's Bid Tabs A Project's Bid Tabs | Summary Tab - Overview of Cumulative Quantity Results  |
Related Articles