
The Areas drop-down is located on the Areas Toolbar and provides you with the ability to change the "Active Area" and select one or more Bid, Page, or Typical Areas to identify takeoff assigned to them. See the next article for details about the "Active Area" and how to select/deselect Areas in the drop-down.

Areas Drop-Down
For our example, we set up four buildings each with Floors 1 - 5; this is what the Areas drop-down list looks like now:
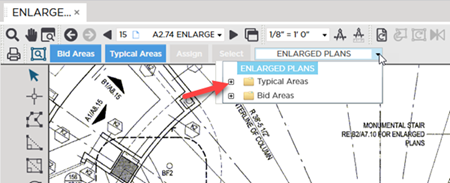
By default all Typical Areas and Bid Areas are collapsed we need to expand them...

Notice the Page Area at the very top of the Areas drop-down? Remember, this is a system-created "Page Area" that the application created automatically based on the Page's Name. You cannot modify Page Areas, but you can make it the Active Area and select it to see what takeoff is assigned to it.
Using the Bid Areas drop-down and the Color Takeoff Control you can choose  (dimmed not colored button) which indicates that only the selected Area(s) takeoff is displayed in colored or
  (colored button) which indicates that the takeoff assigned to all Bid and Typical Areas is displayed in color). We cover using the Colored Takeoff Toggle in detail in Related Articles.
You also use the drop-down and the  and
and  buttons.
It is important that you understand what an "Active Area" is before assigning or drawing takeoff; let's look at the difference between Selected and Active Areas next.
 How to Reorder, Promote/Demote, and Delete Bid Areas How to Reorder, Promote/Demote, and Delete Bid Areas | "Selected Areas" versus the "Active Area"  |
Related Articles