
You don’t want to do a bunch of reading about Takeoff Boost, you want to see it in action. This short guide walks you through running your first automated takeoff.
Takeoff Boost’s tools use Artificial Intelligence to provide results. It is your responsibility to verify results to ensure accuracy.
Use of Takeoff Boost™ tools requires uploading of some or all of your project plans. Ensure you have the legal right to do so. Please see the following Master Service Agreement for more information.
Before You Begin
You should have:
- PlanSwift Core Subscription or Premium Maintenance
- The May 2026 AI Tools Update installed
- The “Sample Project” Job open (or your own Job created with an Architectural plan loaded)
👉 If not, complete see Open an Existing Job.
What You’ll Do
By the end of this article, you will:
- Locate and Scale a plan you want to take off
- Run Auto Takeoff on a plan
- Review detected Takeoff Item and results
- Verify takeoff matches your expectations, make adjustments as needed
- Review the Estimating Tab
Step 1: Open Your Plan
- Locate and click on the Page named “Reflected Ceiling Plans - A151”
- The Scale is already set, but you still need to Verify it
✔️ Your plan should be visible on screen and properly scaled
Step 2: Launch Auto Takeoff
- Activate the Tools ribbon bar
- Click the Auto Takeoff button

- Choose what you want measured (for example, walls, areas, windows, etc.)
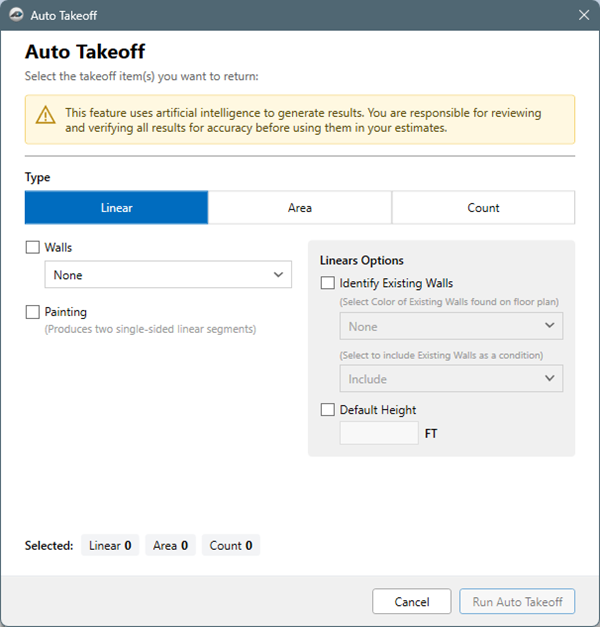
- Click the Run Auto Takeoff button
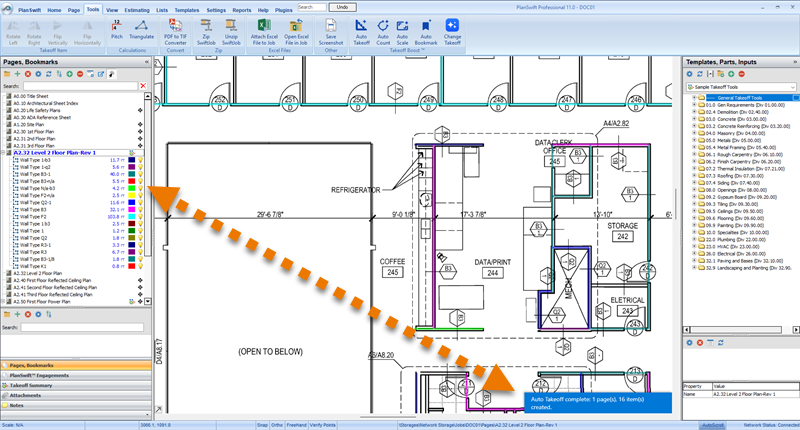
Auto Takeoff uploads the plan, analyzes it, then returns Takeoff Items and takeoffs for your selected results.
✔️ A blue banner shows progress (typically a minute or two)
While Auto Takeoff is running, PlanSwift is unavailable.
Step 3: Review Results
- Takeoff Items are created
- Takeoffs are drawn on the plan
- Quantities are updated in the Pages List
Review:
- Did Auto Takeoff create the expected Takeoff Items?
- Does the takeoff look accurate?
✔️ Your automated takeoff is ready
Need Help? See the next article: Reviewing Auto Takeoff Results
Step 4: Adjust Results (If Needed)
- Reassign takeoff to different Takeoff Items
- Add missing takeoff manually
- Resize, modify, delete takeoff as needed
✔️ You should now have accurate, reviewed quantities
Need Help? Performing Basic Takeoffs
Step 5: Review Estimating Tab
- Click on the Estimating Tab
- Confirm your measurement appears in the list
✔️ Your automated takeoff results are ready to price
What Just Happened
You:
- Automatically scanned a plan
- Generated quantities without manual tracing
- Verified the accuracy of Auto Takeoff’s results
- Reduced takeoff time significantly
Congratulations! You created Takeoff Items and completed takeoff on a full page in under a minute.
When to Use Auto Takeoff
Use Auto Takeoff when:
- You want to speed up repetitive measurements
- You are working with clean, clearly defined plans
- You need a fast starting point for takeoff
 Using Auto Takeoff Using Auto Takeoff | Review and Adjust Auto Takeoff Results  |
Related Articles