
You must keep your On-Screen Takeoff up to date with the latest release to continue to use Auto Takeoff. See On-Screen Takeoff's Product Information and Downloads Page for the current release.
We recommend using PDFs and not converting them to TIFFs when using Takeoff Boost's tools. Auto Takeoff is optimized for PDFs and returns better results, faster when using native PDFs. You can convert to TIFF after running Auto Takeoff if you experience significant performance issues when viewing and navigating Plans.
In the latest versions, Takeoff Boost has been rebranded to encompass all AI-Powered takeoff tools (Auto Takeoff, Auto Count, Auto Link, etc.). What used to be called Takeoff Boost is now called Auto Takeoff.
Please review the previous article for important requirements for using Auto Takeoff.
Takeoff Boost’s tools use Artificial Intelligence to provide results. It is your responsibility to verify results to ensure accuracy.
Use of Auto Takeoff requires uploading of some or all of your project plans. Ensure you have the legal right to do so. Please see the End User License Agreement and Master Service Agreement for more information.
How to Run Auto Takeoff
Running Auto Takeoff is very straight-forward:
- Set and verify Page Scale
- Tell Auto Takeoff the results you want to receive back
- Select which Pages you want to run Auto Takeoff on
- Click the Magic Button
That’s it - then sit back and let Auto Takeoff process your plan. The process takes less than a minute per Page usually.
When Auto Takeoff is done processing,
Set Page Scale
It is critical that you set and verify your Page Scale before running Auto Takeoff on a Page. Incorrect Scale will cause takeoff errors because the service relies on correct Page scale to identify objects on the Plan. Because you can run Auto Takeoff on a Page you are not viewing currently, you must review all the Pages first to ensure their scaled correctly.
See What is Scale and Why is it so Important? for a refresher.
Set up Auto Takeoff
This documentation applies to the current version of On-Screen Takeoff - if you are running an older version of On-Screen Takeoff, you will see the legacy “Takeoff Boost” dialog box, but the process is similar.
After you have set and verified the Page Scale and reviewed the requirements listed in the previous article,
- Click the
 button on the Takeoff Boost Toolbar

The Auto Takeoff pop-up displays:
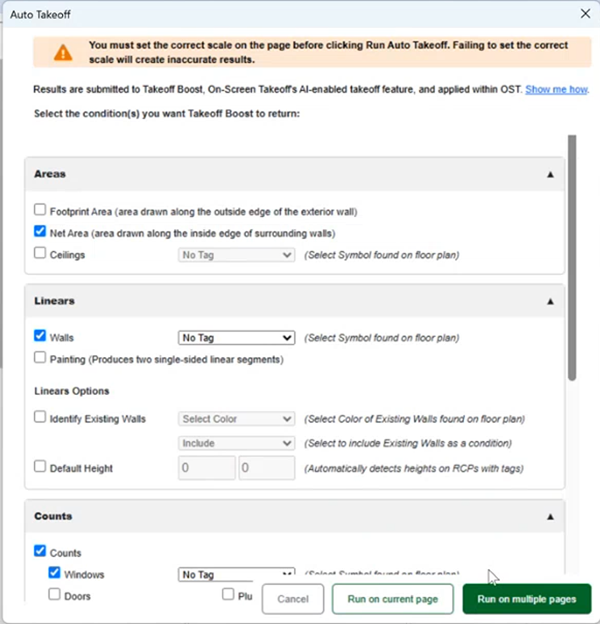
Now, you tell Auto Takeoff what you want to measure.
Select Results and Set Options
The exact options you see may vary depending on the version of On-Screen Takeoff you are running. Older, legacy apps have fewer options.
The first thing you'll want to do is decide which Results you want Takeoff Boost to return.
Areas
- Check whatever you want to measure (don't worry, if you miss something, you can re-run Auto Takeoff and pull down additional Results)
- If you are taking off “Ceilings” and want Takeoff Boost to identify different Ceilings Types, set the appropriate tag
- Takeoff Boost splits ceiling takeoff into ACT (Acoustical Tile) and generic “Ceiling” Conditions based on the pattern on the plan
- Takeoff Boost can identify the different Ceiling Types (based on a shape you select), and then create Conditions and takeoff for each different Type identified on the plan based on that shape
- Footprint and Net Area are on or off, no options required
To takeoff Ceilings properly, you must run Auto Takeoff on a Ceiling Plan or Reflected Ceiling Plan.
We also recommend you use a Ceiling or Reflected Ceiling Plan if you want to takeoff both sides of Walls for Painting - Ceiling plans are typically less “busy” and result it cleaner takeoff (and they typically identify the height, which is automatically set for if, if identified).
Linears
- If you are taking off "Walls", and want Auto Takeoff to identify different Wall Types, set the appropriate tag
- Auto Takeoff can identify the different Wall Types (based on a shape you select), and then create Conditions and takeoff for each different Type identified on the plan based on that shape
- If you are taking off Double-sided walls (like a Painting contractor), it’s recommended to use a reflected ceiling plan, if possible - they are typically cleaner and work better
- If you want Auto Takeoff to identify Existing Walls, set the appropriate color of existing walls on the plans (White, Black, or Gray)
Counts
- If you’re counting Window Types, set the Window Type tag, again based on the shape of the callout on the plan
- Counts, except for Windows, are on or off, no options required
Volume
- There are options to measure Concrete spread footings, slabs, and linear footings (Volume).
- For Linear Footings, there’s an option to split at each Spread Footing identified.
The Condition Results you select are "remembered" for your next Auto Takeoff session.
Wall, Ceiling, and Window Types
Verify on the Wall or Partition schedule/detail how Wall Types are defined on your plans; same for Window Types and Ceiling Types.

If you don’t specify Wall, Ceiling, or Window Type, the objects are still taken off, their results are consolidated under a single Condition for Walls and Windows. Ceilings always breaks takeoff into Gypsum Wallboard (GWB) and ACT.
Select the Pages on Which You Want to Run Auto Takeoff
If you are using an older version of On-Screen Takeoff, you won’t see the Page Selection screen. The ability to run on multiple pages from one dialog box was introduced in v.4.0.0.859.
After you select which Result(s) you want,
- Click the either Run on current page or Run on multiple pages button
- If you select Run on current page, Auto Takeoff begins processing the current page
- If you select Run on multiple pages, you’ll see this screen:
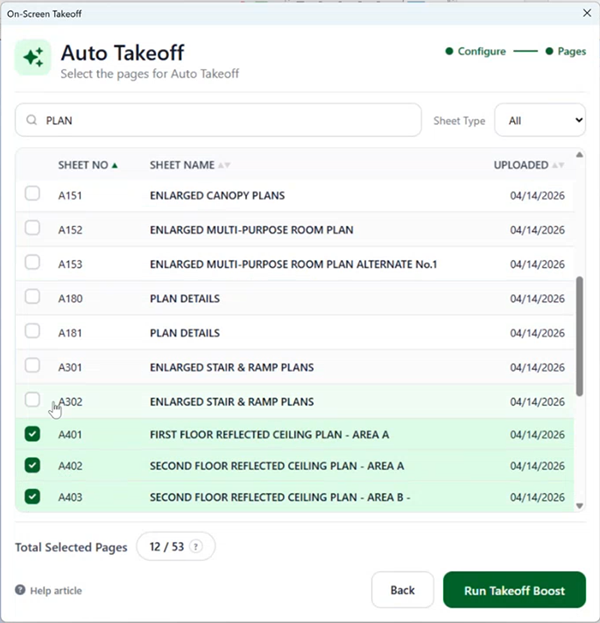
- Select the Page(s) on which you want to run Auto Takeoff - there is no limit
When you select multiple pages, they are processed one at a time, in succession. You’ll see results on a per-page basis as processing completes.
Run Auto Takeoff
Next, assuming you have set and verified your Scale, click the  button.
Set and Verify Scale
We know, it sounds like we keep harping about setting Scale. There are two good reasons:
- Changing Scale after takeoff is drawn is not a guaranteed process. Some objects may not fit on the Page, some cannot be properly re-scaled, sometimes there are unforeseen issues.
- Auto Takeoff relies on the Scale of a drawing during processing to correctly identify objects to be taken off, incorrect Scale can cause incorrect results.
Always set and verify Scale before drawing any takeoff or running Auto Takeoff.
After a few moments, you’ll see this Takeoff Boost dialog box.
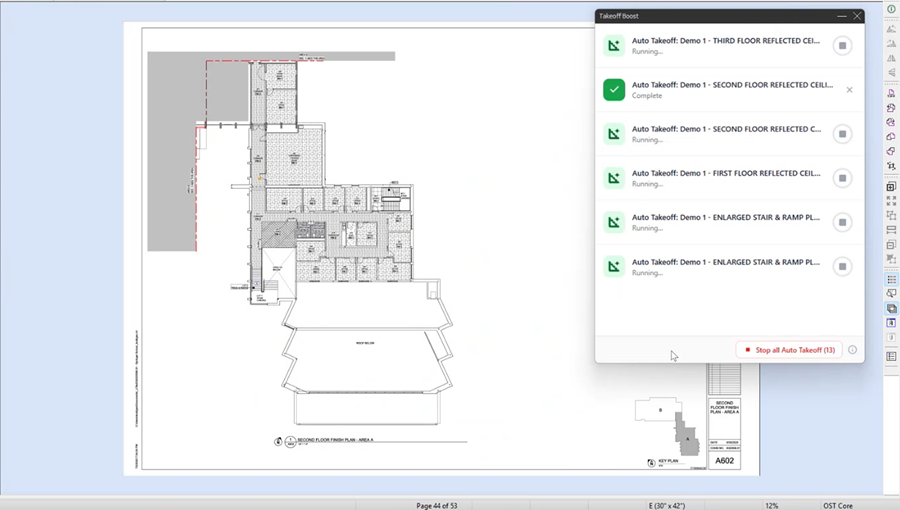
This indicates the Plan(s) was uploaded successfully and the service is analyzing it.
As processing completes, the indicator changes to a green checkbox.
You can stop individual pages by clicking the stop button to the right of the Page name or cancel all running processes using the Stop all Auto Takeoff button. Processed Pages are not affected by stopping running processes.
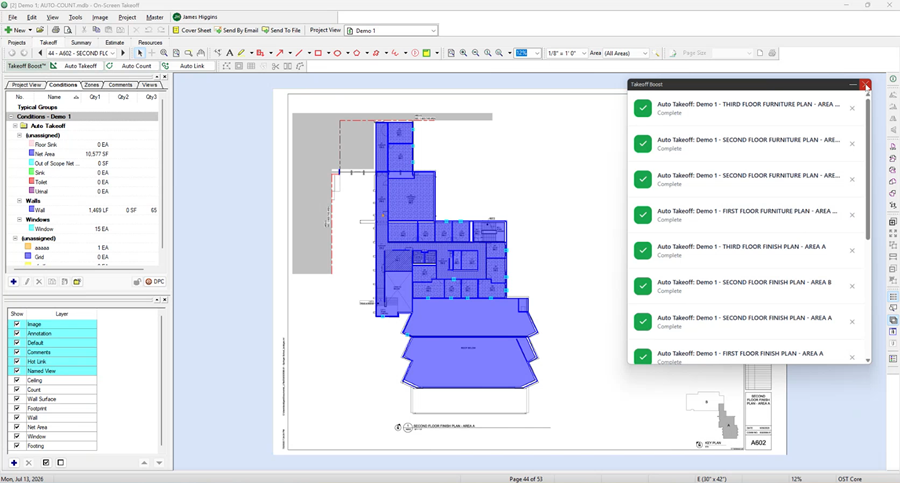
It takes 20-60 seconds or so for the service to return results.
Review Results
In the next few articles, we'll cover reviewing and manipulating the Results that Auto Takeoff returns.
Canceling Auto Takeoff
If you close/exit On-Screen Takeoff or close this database, you receive a caution message alerting you that Auto Takeoff will be canceled on whichever Page it is running. If you cancel, it's not big deal: you can always run Auto Takeoff again after you reopen On-Screen Takeoff or the database.
If Auto Takeoff was in the process of writing results to the database, those result will be saved and you'll see the Auto Takeoff Conditions and takeoff on the Page next time you open On-Screen Takeoff or the database.
 Takeoff Boost's Auto Takeoff Overview and Requirements Takeoff Boost's Auto Takeoff Overview and Requirements | Auto Takeoff Conditions and Takeoff (Boost Results)  |
Related Articles