
After Auto Takeoff returns results to On-Screen Takeoff, the first thing you'll want to do is:
- Review them and determine what you want to keep and what you can Delete, (this article) then...
- Identify which Conditions you need to rename and move out of the Auto Takeoff folder, (next article)
- Reassign takeoff to Different Conditions
- Making Adjustments and Corrections to the Auto Takeoff Conditions and takeoff so it matches your Plan
- Figure out what you need to takeoff manually
We recommend running Auto Takeoff on every Page you plan to take off before Reviewing, Deleting, Editing, etc. This way, you'll need to edit Conditions just once and won’t make more work for yourself.
Review Results
Takeoff Boost’s tools use Artificial Intelligence to provide results. It is your responsibility to verify results to ensure accuracy.
Use of Auto Takeoff requires uploading of some or all of your project plans. Ensure you have the legal right to do so. Please see the End User License Agreement and Master Service Agreement for more information.
As we mentioned in the previous articles, Auto Takeoff can return many results. Usually, you’ll select exactly what you want, but there may come a time when you get back Conditions or takeoff you just don’t need.
Conditions created by Auto Takeoff:
- Are created in a folder named, "Auto Takeoff" (estimating isn’t very creative)
- Auto Takeoff assigns the Conditions it creates to specific Layers, so you can toggle off everything else and focus just on the Conditions and takeoff created by Auto Takeoff
Auto Takeoff Conditions
The "Auto Takeoff" folder and Layers are what Auto Takeoff creates by default. In the next few articles, we're going to walk you through moving those Conditions to your own Folders (if you want), renaming the Conditions as needed, and reassigning various takeoff objects to Conditions you create.
If you run Auto Takeoff on all the Pages in your project first, then go back to modify the Conditions/takeoff that Auto Takeoff created, Auto Takeoff re-uses the same Conditions on each Page (the ones in the "Auto" folder). So, when it comes time to modify those Conditions, you only need to do it once. However:
- If you rename a Condition, Auto Takeoff will not re-use it when you run it on another Page or re-run it on the current Page - Auto Takeoff creates a new Condition in the "Auto Takeoff" folder.
- If you move an Auto Takeoff Condition out of the "Auto Takeoff" folder, it will not be re-used when you run Auto Takeoff on another Page or re-run it on the current Page, Auto Takeoff creates a new Condition in the "Auto Takeoff" folder.
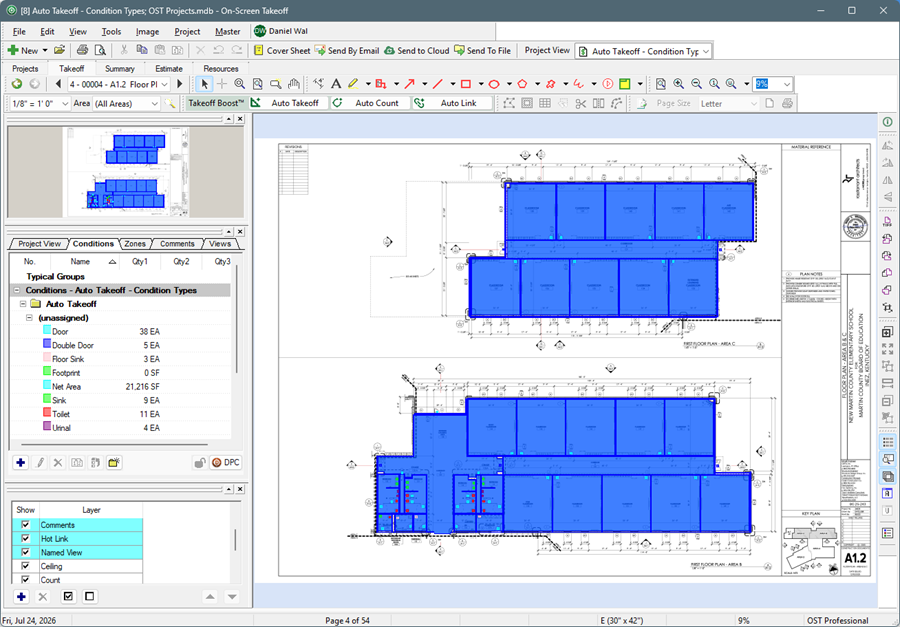
The first thing you're going to want to do is figure out what you need (want to keep) and what you don't (what you're going to delete).
- Turn off the "Default" Layer and any custom layers you created to hide all the Conditions/takeoff you've already created.
- Leave the "Image" layer and all Layers created by Auto Takeoff turned on - this makes reviewing Auto Takeoff’s results easier. See The Layers Window for help showing/hiding Layers.
Delete What's Not Needed
Let's start by deleting the "stuff" we don't need for our bid. You can delete the takeoff or the Conditions, we cover both below:
Delete Takeoff Associated with an Auto Takeoff Condition (leaves the Condition)
Because Auto Takeoff uses the same Conditions when it's run on multiple Pages, it's best to perform deletions and edits in a way that affects only the current Page. That's why we recommend selecting and deleting the takeoff associated with Auto Takeoff Conditions Page by Page and not deleting the Conditions that Auto Takeoff created (which would affect the entire Bid).
This is also why we recommend running Auto Takeoff on all Pages before you start editing. That way, if you do delete or rename a Condition (the next section in this article), you won't have to do it multiple times.
In the Conditions list,
- Right-click on the Condition whose takeoff you want to delete (in our example, we just want the Walls, so we right-click on Net Areas) - the Condition context menu opens,
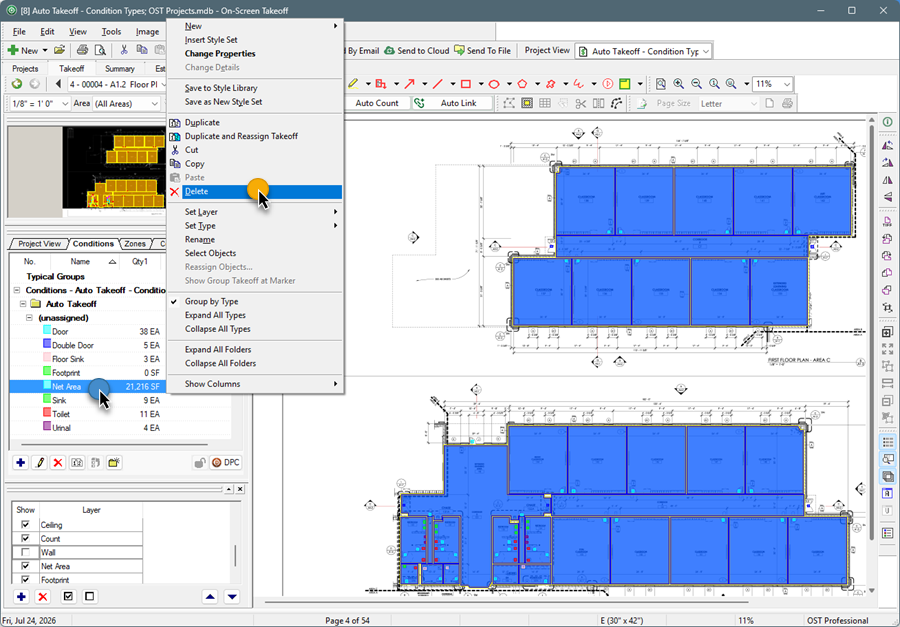
Do NOT select DELETE in the Context Menu now - that deletes the Condition from the Project.
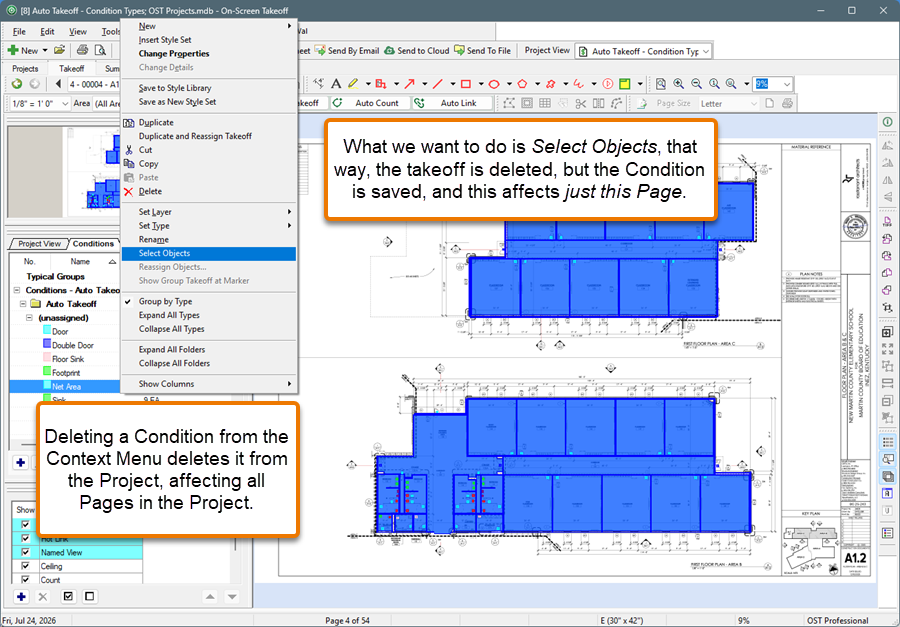
- Click Select Objects
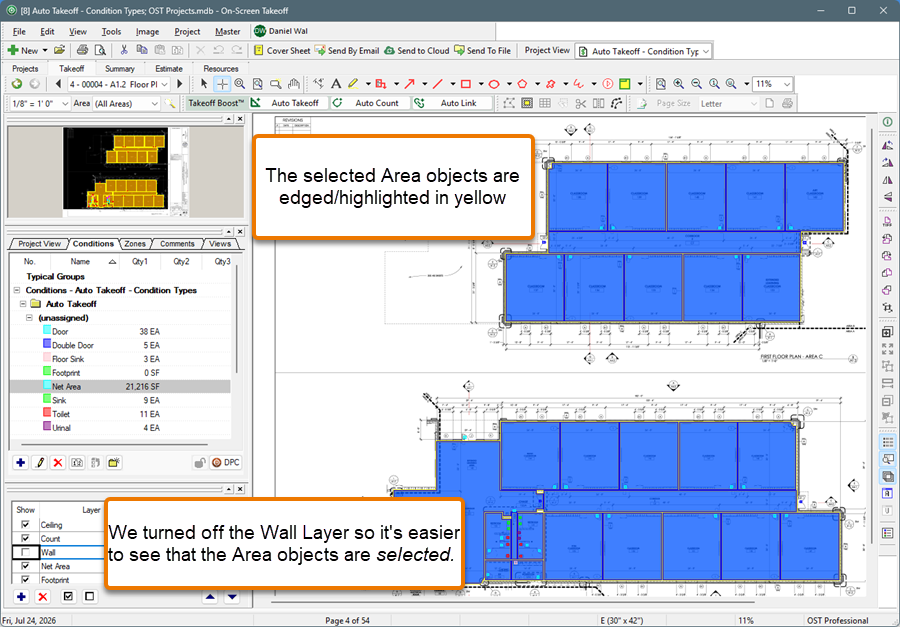
This selects all the takeoff objects, on this Page, associated with that Condition.
Notice, they all have a yellow border around them (if you've run Auto Takeoff on other Pages, the takeoff on those Pages is not affected).
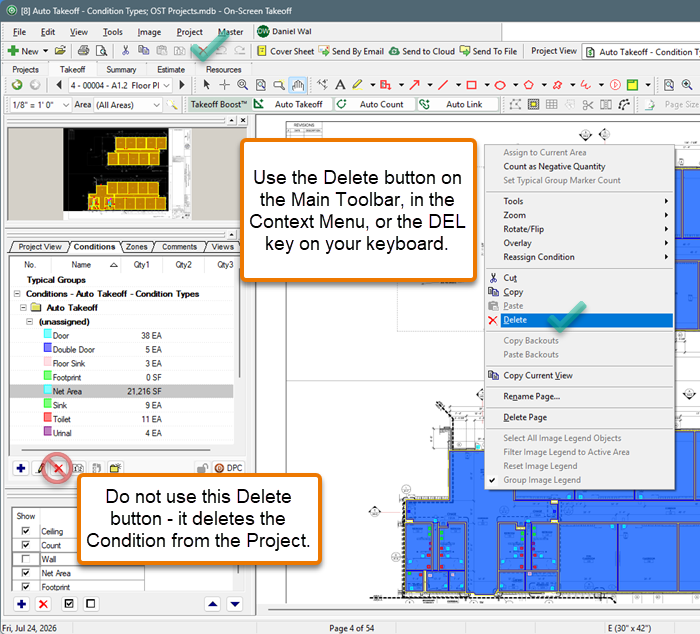
Next, there are several options to delete selected takeoff objects:
- Click
 in the Main toolbar, or
 - Press the <DEL> key on your keyboard, or
- Right-click on one of the selected objects and select Delete from the context menu
Pay close attention to which button you click. Do not click the button in the Conditions Window toolbar - this deletes the Condition from the Project entirely, which deletes it and all takeoff drawn with it, on every Page in this Bid.
On-Screen Takeoff does not prompt you to confirm deleting takeoff objects because, while you're still on this Page, you can "undo" the action. Once you navigate to another Page or leave this bid, you lose the ability to "undo" deleting takeoff.
You will hear a “trash” sound indicating the objects have been deleted.
If you made a mistake, just hit CTRL+Z to undo the action (before changing Pages/Bids/Projects).
- Repeat this process of selecting objects and deleting them for any takeoff you don't need.
- Leave all unused/unneeded Auto Takeoff Conditions in the Auto Takeoff folder, in the next article, we'll walk you through editing the Conditions you need and moving them out of the folder.
See Selecting and Editing Takeoff and Annotation for more information.
Delete the Auto Takeoff Condition (Deletes the Condition and all its Takeoff)
You can delete an Auto Takeoff Condition which deletes all takeoff, on every Page drawn with the Condition.
If you know that Auto Takeoff has not been run on any other Page in this Bid (by you or anyone else), and you are certain that you do not need a particular Condition (such as drywall contractor and plumbing fixtures) you can delete the Auto Takeoff Condition(s).
Deleting a Condition deletes it from this bid entirely - this affects all Pages in the bid (Base Bid, Alternate, OR Change Order, but not all bids in the Project) and all takeoff drawn with this Condition. If you are not absolutely certain you have not used this Condition on another Page (that this is the only Page on which you've run Auto Takeoff), use the "Select Objects" method (above) to delete the Auto Takeoff drawn takeoff instead.
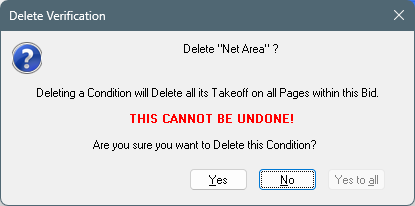
There is no undoing deleting a Condition - once it is gone, it and all its takeoff are gone for good.
To delete a Condition,
- In the Condition list, click on the Auto Takeoff Condition you want to delete and click the button at the bottom of the Conditions window, or
- Click on the Condition and then press the <DEL> key on your keyboard, or
- Right-click on one of the Auto Takeoff Conditions in the Conditions list and select "Delete"
You can select and delete multiple Conditions at once by pressing the key (Conditions adjacent to each other) or key (Conditions not adjacent to each other).
Because this is an action that cannot be "undone", On-Screen Takeoff prompts you to confirm the action. Remember, deleting a Condition affects all Pages in your bid, not just the Current Page.
- Click Yes if you are absolutely certain you want to delete the Condition and any takeoff drawn with it throughout this bid
Delete any Auto Takeoff Conditions you are certain you don't need. For our examples in the next few articles, we deleted all but the "Wall" Condition.
After deleting a Auto Takeoff Condition(s), if you run Auto Takeoff on another Page (or even again on this Page), Auto Takeoff re-creates any Conditions it requires. This is why we recommend running Auto Takeoff on all the Pages in your bid on which you intend to perform takeoff before starting the "clean up" process.
Next up, editing what's left to suit your needs.
 Auto Takeoff Conditions and Takeoff (Auto Takeoff Results) Auto Takeoff Conditions and Takeoff (Auto Takeoff Results) | Editing and Moving Auto Takeoff Conditions  |
Related Articles