
After Auto Takeoff returns results to On-Screen Takeoff, you:
- Review them and determine what you want to keep and what you can delete, (previous article)
- Identify which Auto Takeoff Conditions you need to rename and move out of the Auto Takeoff folder, (this article)
- Reassign takeoff to Different Conditions (next article)
- Making Adjustments and Corrections to the Auto Takeoff Conditions and takeoff so it matches your Plan,
- Figure out what you need to takeoff manually
In the previous article, we explained how to get rid of what you don't need (our example was a Drywall Contractor who just needs the Wall takeoff so we deleted all the "area" and "count" results, although it is much easier and faster to de-select them in the Auto Takeoff Auto Takeoff dialog box before running it - see the article Running Auto Takeoff for details).
This leaves us with the "Wall" Condition and all its takeoff.
If you did not instruct Auto Takeoff to identify Wall Types, it creates a single "Wall" Condition for all the linear takeoff it returns. Now, we need to update the Conditions that Auto Takeoff did create (this article) and then create some additional Conditions and do some reassigning of takeoff (both covered in the next article).
Let's start with updating that "Wall" Condition that Auto Takeoff created...
Edit Auto Takeoff Conditions to Meet Your Needs
Takeoff BOOST™’s tools use Artificial Intelligence to provide results. It is your responsibility to verify results to ensure accuracy.
Use of Auto Takeoff requires uploading of some or all of your project plans. Ensure you have the legal right to do so. Please see the following Master Service Agreement for more information.
When you do not specify a Wall Type, Auto Takeoff returns a rather generic Condition name and lumps all linears into this Condition named "Walls". In the next article, we are going to create additional Linear Conditions and then walk you through reassigning takeoff from the Auto Takeoff Condition to your custom Conditions. But first, once we've run Auto Takeoff on every Page we intend to take off, we'll use that "Wall" Condition as a starting point, no need to get rid of it.
Some of the screenshots below show the old “Boost” branding; what used to be called “Takeoff Boost” has been rebranded as “Auto Takeoff”, part of the Takeoff BOOST™ suite of AI-Powered tools.
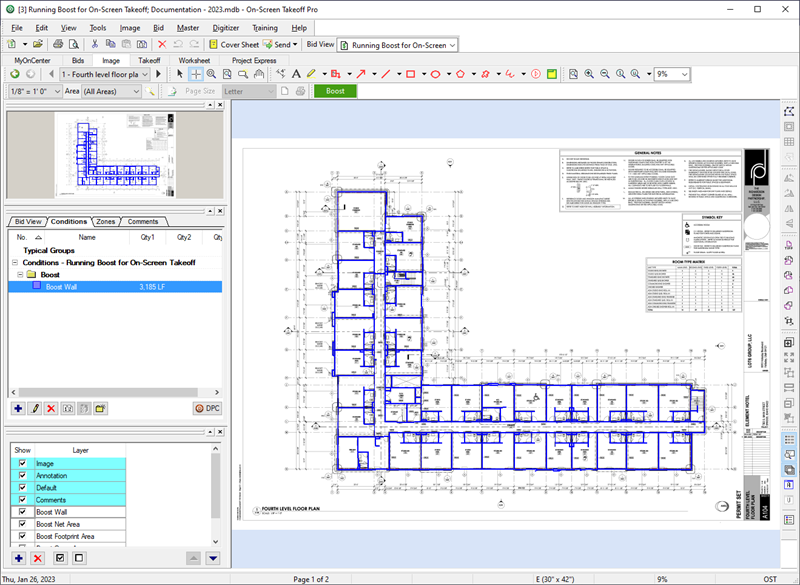
- First, review the Plan, the Conditions, and the takeoff that Auto Takeoff returned and figure out what is the most prevalent linear object (for example, in our, we're going to cheat a little and just make a decision and say "Exterior Wall" is the most prevalent, it's 50/50 on this particular Plan)
- Next, double-click on the "Wall" Condition (or any other Auto Takeoff Condition) in the Conditions list to open its Condition Properties dialog box
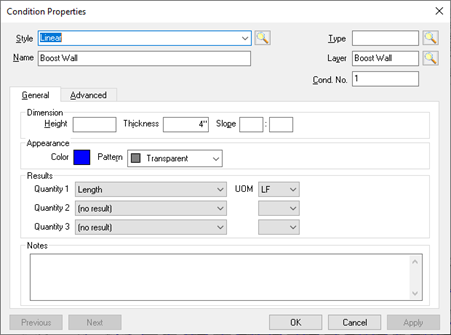
Notice, only the very basic Condition Properties are filled in, (for concrete (volume) Conditions, some Notes are filled in).
We recommend that you update/fill-in the following fields:
- Condition Name (Auto Takeoff uses "Walls" for all linear takeoff, this probably won't be exactly what you need, but between this article and the next, we'll get the takeoff sorted out).
- For now, we're going to change the name to Exterior Wall (for simplicity's sake)
- Type (Auto Takeoff does not assign a Condition Type to every Condition (it does assign a Type to: Walls, Ceilings, Auto Counts, and Concrete Conditions), you can group the Conditions Window, and the Summary and Estimating Tabs by "Type" so we encourage you to assign one.
- We named our Type "Exterior Walls"
- Layer (Auto Takeoff assigns all its Conditions to Auto Takeoff-specific Layers, in this case "Walls". We encourage you to assign this Condition to a custom Layer.
- Dimensions (If you takeoff linears on a RCP, Auto Takeoff can find heights if they are indicated, else you can configure a “default Height” for linear Conditions.)(
- We set our Height to 14 feet and our Thickness to 8 inches.
- Results (you may want to select additional Results, depending on your needs)
- Based on customer feedback, Auto Takeoff typically select the most appropriate Results for the Condition Style returned, you can always adjust post-processing.
- Appearance
- You may want to adjust a Conditions color, transparency, pattern, or shape.
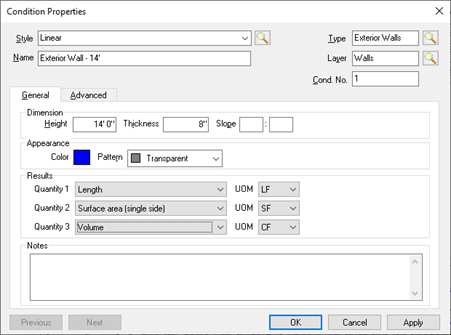
- Click OK to save the changes
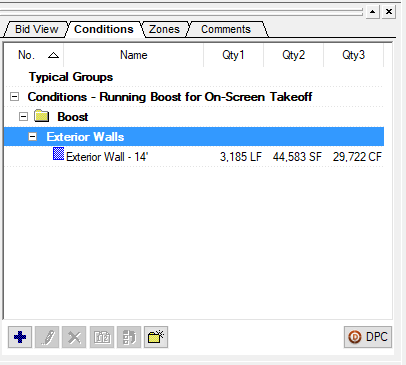
Notice the additional Results and updated name in the Conditions list?
Next, let's move this Condition to out of the “Auto Takeoff” (or “Boost”) folder.
Move Conditions to Custom Folders
The next thing we recommend is to move the Auto Takeoff Conditions out of the “Auto Takeoff” or “Boost” folder into whatever Custom folders you use (or even no folder).
- Click on a Condition and drag-n-drop it where you want it to be placed, in this case, we don't want to put it in a folder, so we drag it on the "Conditions..." header
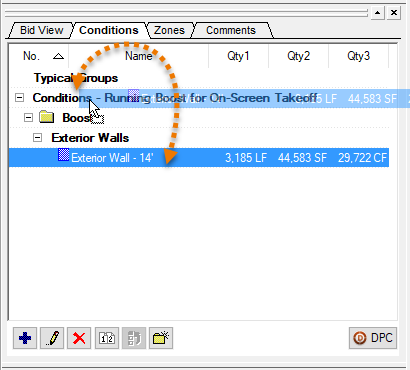
- And release the mouse button
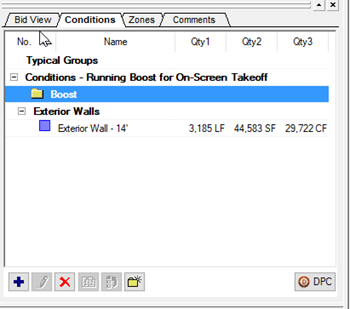
OK, so we have our Condition updated and moved. Next, we need to create a few more Conditions and assign the various interior walls to those.
Reminder... now that there are no Conditions that Auto Takeoff created or associated takeoff, we could run Auto Takeoff again on this Page. All the automated Conditions would be re-created - any Conditions we renamed or moved out of the Auto Takeoff/Boost folder would be not affected or used by Auto Takeoff again. We cover re-running Auto Takeoff in Related Articles.
 Reviewing Auto Takeoff Results and Deleting What's Not Needed Reviewing Auto Takeoff Results and Deleting What's Not Needed | Reassigning Auto Takeoff’s Results to Other Conditions  |