
PlanSwift provides specialty takeoff items that are available from the Area, Linear, Segment, and Count drop-down menus located on the Home tab ribbon-bar. These are the Single-Click Area, Linear, and Count, Roof Area, Price Per, SQ FT Area, Area Cubic Yards, Grid, and Joists.
- Roof Area Takeoff
- Price Per SQ FT Area Takeoff
- Area Cubic Yards Takeoff
- Grid Tool Area Takeoff
- Joist Area Takeoff (covered below)
- Single-Click Area, Linear, and Count Takeoff
Performing a Joist Tool Area takeoff requires familiarity with performing an area takeoff. The Joist Tool Area takeoff is useful for automatically calculating joists, rafters, and rake walls (to calculate stud lengths). When using the Joist Tool for rafters, the rafter application requires a slope to be entered.
Joist Tool Area Takeoff
Set up the Takeoff Item
- Click on the drop-down half of the Area button and select Joist Tool from the drop-down menu
- This opens the Properties – [Joist Tool] window. Enter a name, such as “First Floor Joist Takeoff”, for the joist takeoff
- Enter the joist type, such as TJI-560, in the Joist Type field
- Enter the length calculation method to be used in the Length Calculation field. For this calculation, select Nearest Even Foot. The drop-down menu options are:
- None (which will produce a joist length in feet and inches)
- Nearest Foot (which rounds the value up to the next whole foot number)
- Nearest Even Foot (which rounds the value up to the next even foot)
- Nearest 2 Feet (which rounds up to the nearest whole number, adds one and then, if the result of that is odd, adds one more).
- Enter the joist direction in the Joist Direction field - choose Select Parallel Side. The drop-down menu options are:
- First Two Points (joists will be parallel to the first two Points of your takeoff)
- Horizontal (joists will be drawn horizontally)
- Vertical (joists will be drawn vertically)
- Select Parallel Side (allows you to draw joists parallel to a side of the plan by selecting two Points). If this is selected, then the Automatically Generate option is disabled.
- Enter the on-center spacing in the O.C. Spacing field. Values in the drop-down menu are: 8, 12, 16, 19.2, 24, 32, or you can enter a different value. Select 24
- The Pitch field is used for rafters. Enter zero for joists. For rafters, enter the pitch of the rafter. Leave this blank or at zero
- The Min Length is the shortest size of material available for purchase. Leave blank
- The New Length is the length of the material that will be ordered. Leave blank
- Select the color in the Color field for the takeoff
- Select the Fill Type in the Fill Type field (Solid, Hatch Pattern, or Texture)
- The Group Sections is used when you have multiple joist sections that are all the same. As an example, a five-story building might have the same joist design for each floor. By breaking out each of the sections (floors) separately, it is easier to estimate the cost of each floor. Do not select this
- Clicking on Generate Parts will generate a part for each joist in the Estimating screen and will group joists of the same length into the same part. Select this
- Clicking on Automatically Generate will generate the joist takeoff locations automatically after the area takeoff is completed, but only if the Select Parallel Side joist direction is NOT selected. If you need to add double joists or split joists, you may not want to select the Automatically Generate option. For this exercise, do not select this
- Clicking on Show Labels will generate labels showing the length of each joist. Select Show Labels
- Click on Ok to continue.

Draw the Takeoff
- Starting at the arrow, perform the takeoff using the standard takeoff procedure
- Complete the takeoff by selecting Stop from the right-click menu or by pressing the Esc key

Configure the Joists
- Click on the completed takeoff to select it, which highlights the takeoff in a red border.
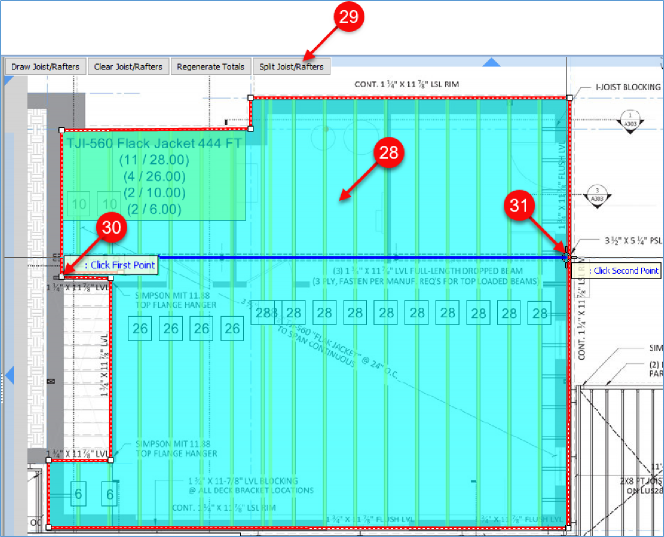
Four selections now appear:
- Draw Joists/Rafters (which draws the joists/rafters)
- Clear Joist/Rafters (which clears any drawn joists/rafters)
- Regenerate Totals (which regenerates totals)
- Split Joists/Rafters (which splits joists/rafters)
- Click on Draw Joist/Rafters.
- You are prompted to click on the first Point for placement of the joists, then to click at the second Point (at the other end of the same joist); this creates all of the single joists.

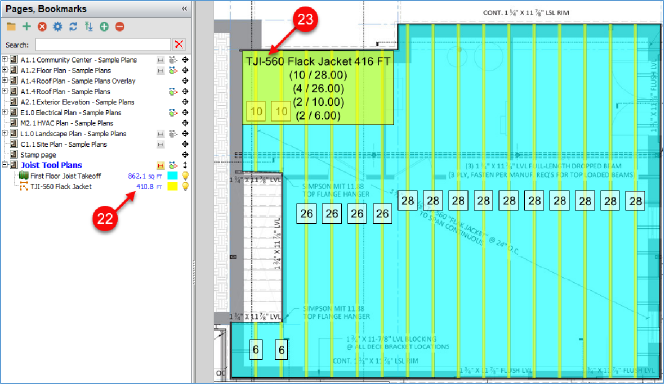
The First Floor Joist Takeoff shows 862.1 SQ FT, and the total length of all joists measures 410.8 FT.
The label shows ten 28-FT joists, four 26-FT joists, two 10-FT joists, and two 6-FT joists.
- If you need to double one of the joists, click on a joist to select it so that it is highlighted in red.
The Add Double Joist button now appears.
- Click on it.
The doubled joist appears next to the one that was selected.
The note automatically updates to show eleven 30-FT joists.

Splitting Joists
If you want to split the joists and rafters,
- Click on the First Floor Joist Takeoff area
- Click on the Split Joist/Rafters button
- Click on the first Point (the left side of the dropped beam in this example)
- Click on the second Point (the right side of the dropped beam in this example)
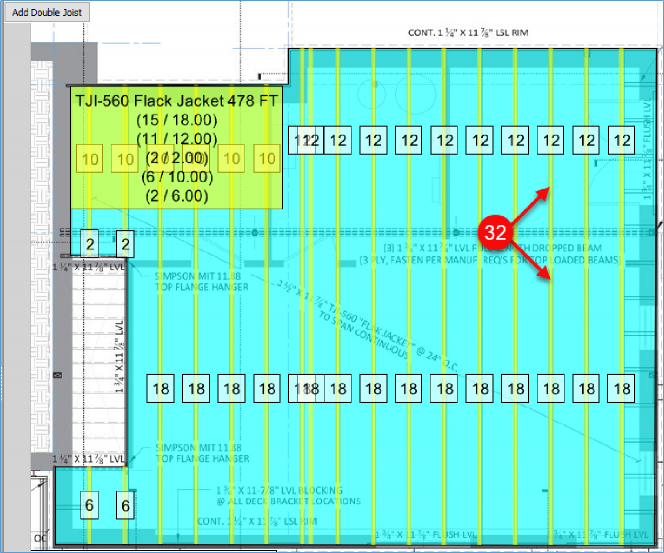
The split joists appear. Note that the 28-FT joists are now split into a 12-FT and an 18-FT joist (which makes 30 total feet). The extra two feet are added because the rounding option was set to Nearest Even Foot, and each of the joists had a foot added to them.
Adjust Rounding
If you want to change the rounding properties or any other joist properties,
- Double-click on the area takeoff (or right-click on the area takeoff and select Properties from the drop-down menu)
- After making any changes to the properties, click on Ok to close the Properties window
- Click on Regenerate Totals to have the properties updated

- Click on the Estimating tab of the PlanSwift Main menu.
The joist estimates are listed in the Estimating screen.

 Gridded Area Takeoff Gridded Area Takeoff | Wall Area Linear Takeoff  |
Related Articles