
Auto Takeoff, part of Takeoff BOOST™, automatically detects and measures items on your plans - no manual tracing required.
If you have a Starter subscription, you won’t have access to Takeoff BOOST’s AI-powered features, but you can still create Conditions and takeoffs manually.
This guide walks you through creating your first project, adding documents, and running your first automated takeoff.
What You’ll Do
By the end of this guide, you will:
- Open a Page and Verify Scale
- Run Auto Takeoff
- Review detected Conditions and takeoff
- Update Conditions and takeoff as needed
Takeoff BOOST’s tools use Artificial Intelligence to provide results. It is your responsibility to verify results to ensure accuracy.
Use of Takeoff BOOST tools requires uploading of some or all of your project plans. Ensure you have the legal right to do so. Please see the following Master Service Agreement for more information.
Before You Begin
You should have, you must have:
- Accepted your Company’s admin’s invitation to set up your account in the ConstructConnect Platform
- Logged into ConstructConnect Takeoff
- Created a Project and added Drawings/Plans (Auto Takeoff only works on Architectural drawings)
Step 1: Open Page, Verify Scale
- On the Projects Tab, click the Takeoff button (
 ) for your Project
 - Open the Page you want to quantify
- Verify page scale
✔️ Your plan should be visible on screen and properly scaled
Step 2: Run Auto Takeoff
- In the Conditions panel on the left side, click
 , the Condition dialog box opens to the Auto Takeoff tab
 - Choose what you want measured (for example, Linears (walls), Areas (rooms, ceilings), Counts (doors, windows, plumbing fixtures, etc.)

09-18-2026 Updated Auto Takeoff dialog box, your’s may differ slightly
If you configure Linear, Area, or Count results, you cannot use the Exterior, Concrete, Flooring, or Landscaping option - they are mutually exclusive. You can always come back to the Auto Takeoff dialog box and run it again to get additional results on a Page.
- Click the Auto Takeoff button
Auto Takeoff scans the page and generates Conditions and takeoff automatically.
✔️ A pop-up, in the bottom-right corner, shows progress (expect Auto Takeoff to take a minute or two per page - you can start it on one Page and then work on another)
Step 3: Review Conditions and Takeoff
After Auto Takeoff completes:
- Conditions are created, notice that for many Conditions, Auto Takeoff will pull “Notes” directly from the Plans.
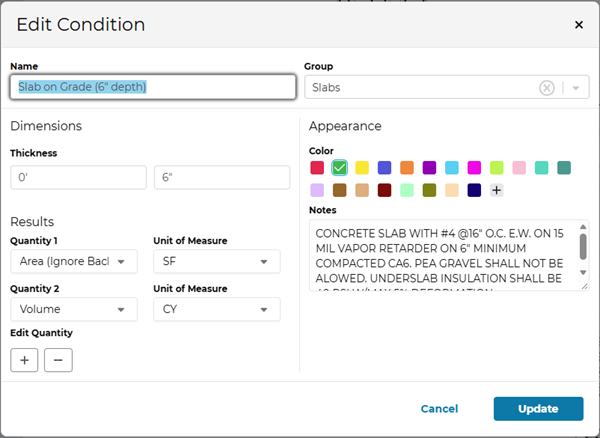
- Takeoff is drawn on the plan
- Quantities are updated in the Conditions List

Review:
- Did Auto Takeoff create the expected Condition(s)?
- Does the takeoff look accurate?
✔️ Your automated takeoff is ready
Step 4: Adjust Results (If Needed)
- Reassign takeoff to different Conditions
- Add missing takeoff manually
- Adjust takeoff as needed
✔️ You should now have accurate, reviewed quantities
Need Help? See: Creating and Editing Conditions and Takeoff
What Just Happened
You:
- Automatically scanned a plan
- Generated quantities without manual tracing
- Reduced takeoff time significantly
Congratulations! You created Conditions and completed takeoff on a full page in under a minute.
When to Use Auto Takeoff
Use Auto Takeoff when:
- You want to speed up repetitive measurements
- You are working with clean, clearly defined plans
- You need a fast starting point for takeoff
 Create Your First Project in ConstructConnect Takeoff (Web) and Add Documents Create Your First Project in ConstructConnect Takeoff (Web) and Add Documents | Create Your First Manual Condition and Takeoff in ConstructConnect Takeoff (Web) in Under 5 Minutes  |